User Guide
Projact User Guide
Table of Contents
Introduction
Welcome to the Projact User Guide!
Is Projact a typo?
Nope, Projact is a combination of Project and Contact! It is a project and contact management app that helps you, NUS computing students, to organise your fellow students’ contacts by their modules or internship/work companies along with your project teams’ meeting links and tasks.
Projact has been optimized for use via a Command Line Interface (CLI) so you can easily type all the commands. But no worries, there is still a Graphical User Interface (GUI) so you can see every change you make to your contacts, meeting links and tasks.
How does Projact work?
Projact stores:
- A list of the contacts you have added.
- A list of tags which you use to label your contacts.
About this User Guide
This user guide provides in-depth documentation on the features in Projact to facilitate the effective organisation of your contacts. In addition, the quick start guide provides an end-to-end setup process to get you started.
A basic understanding of how the Command Line Interface works would be good. However, a lack of it would not affect your experience with Projact as prior technical experience is not required.
Before you go on, here are some key terms and symbols you should know!
Key Terms
What are Contacts?
- People whose information you store inside Projact are known as contacts.
- Contacts contain the following information:
- Name
- Phone number
- Email address
- Telegram address
- You can also tag your contacts!
Wait, what are Tags?
- Tags are extremely customizable labels you can use to help organise your contacts.
- Each contact can have any number of tags, from 0 to any number you assign it!
- Tags can store the following information:
- Tasks
- Links
How about Tasks?
- Ever forget what to-dos have been allocated to your project mates? Keep track of them by storing the to-dos as Tasks in Projact!
- Tasks are stored under a tag so you can easily categorise them.
- Whenever you or your project mates are done with their tasks, you can easily check them off and feel accomplished!
And Links?
- There are so many links floating around now and it’s tough to keep track of them all. But don’t worry, we’ve got your back!
- The link will be stored under a tag so it’s easy to know what it’s for.
Index?
- Index refers to the contact’s or tag’s position in its list. You will need this to use many of the commands! But fret not, it’s really easy to identify the index of your desired contact or tag. Find out more about this later on in the User Guide!
Symbols
Now you’re prepared to embark on this journey and have Projact manage your contacts and projects.
Quick start
-
Ensure you have Java
11or above installed in your Computer. Click here to check if you have the correct version of Java installed. -
Download the latest
projact.jarfrom here. -
Copy the file to the folder you want to use as the home folder for your Projact application.
-
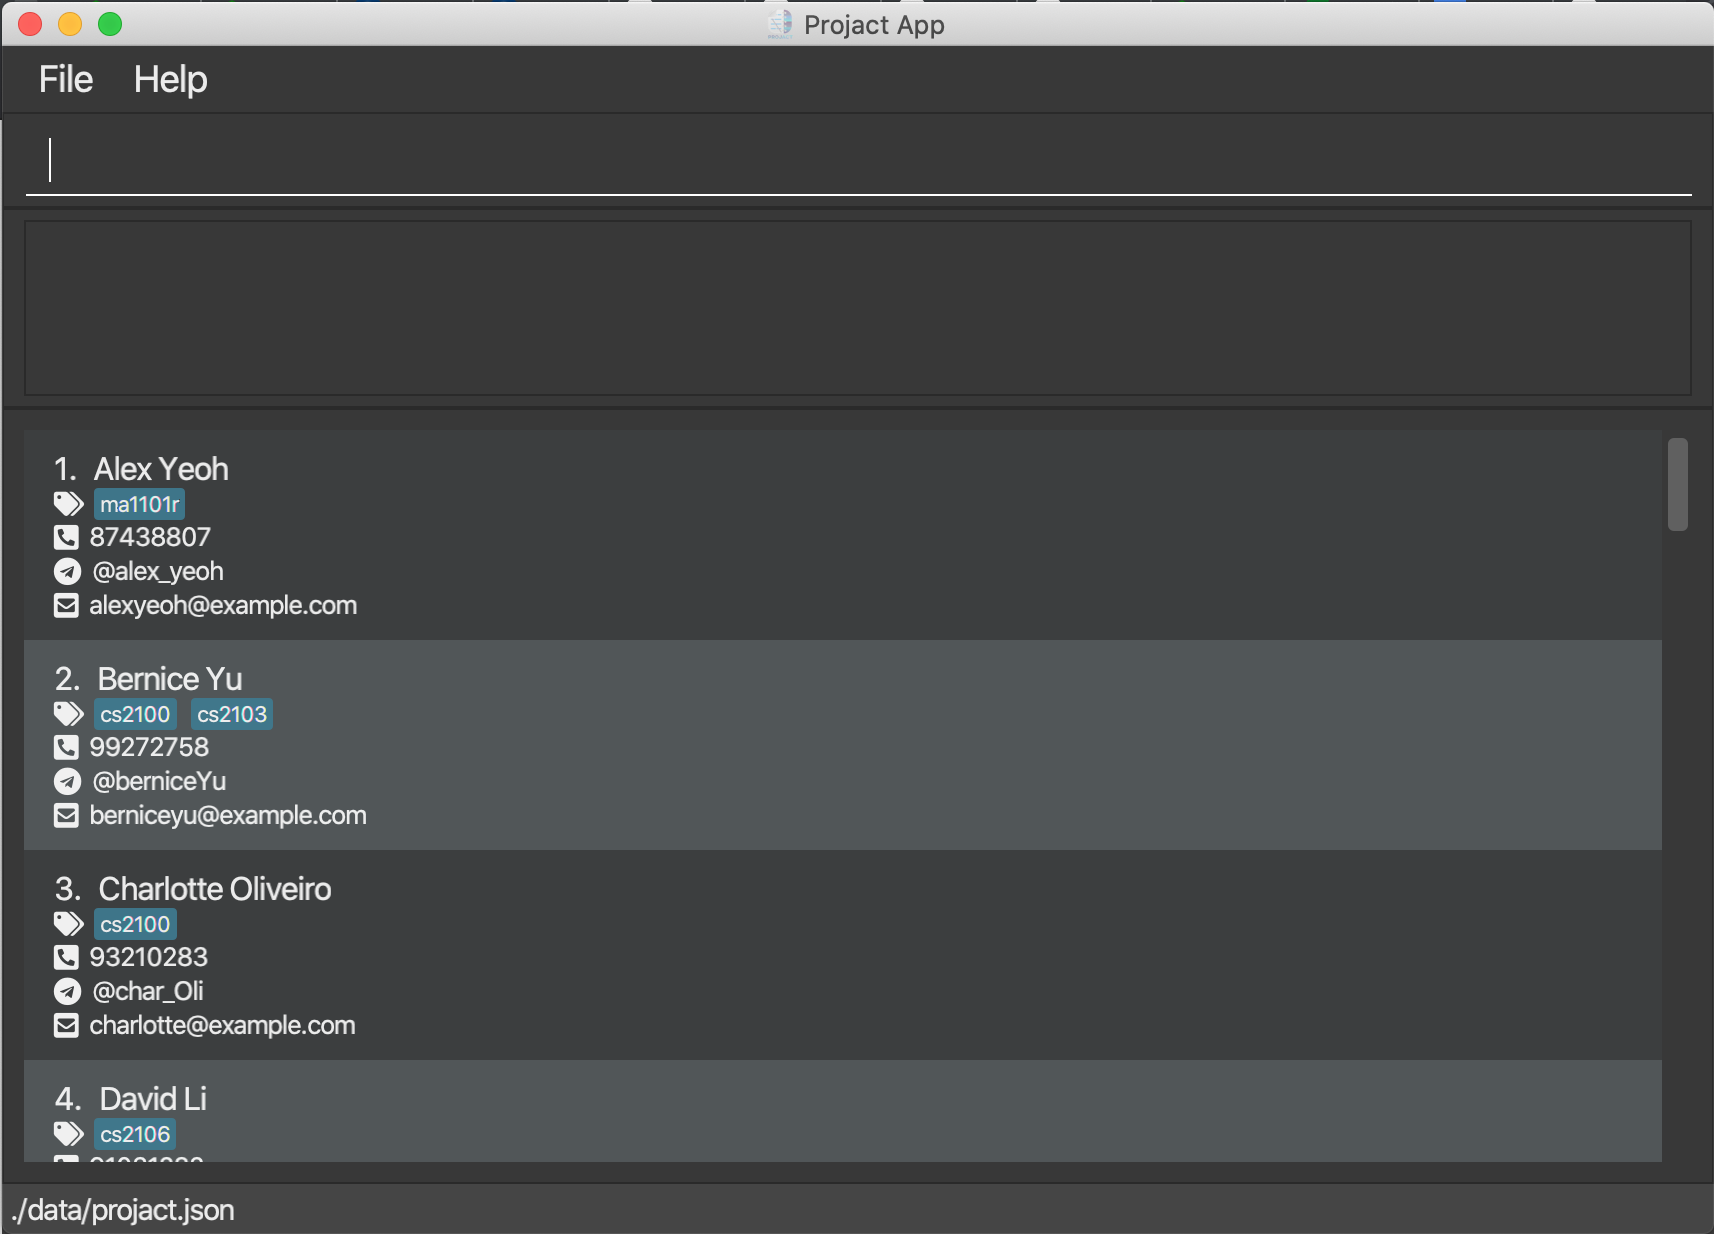
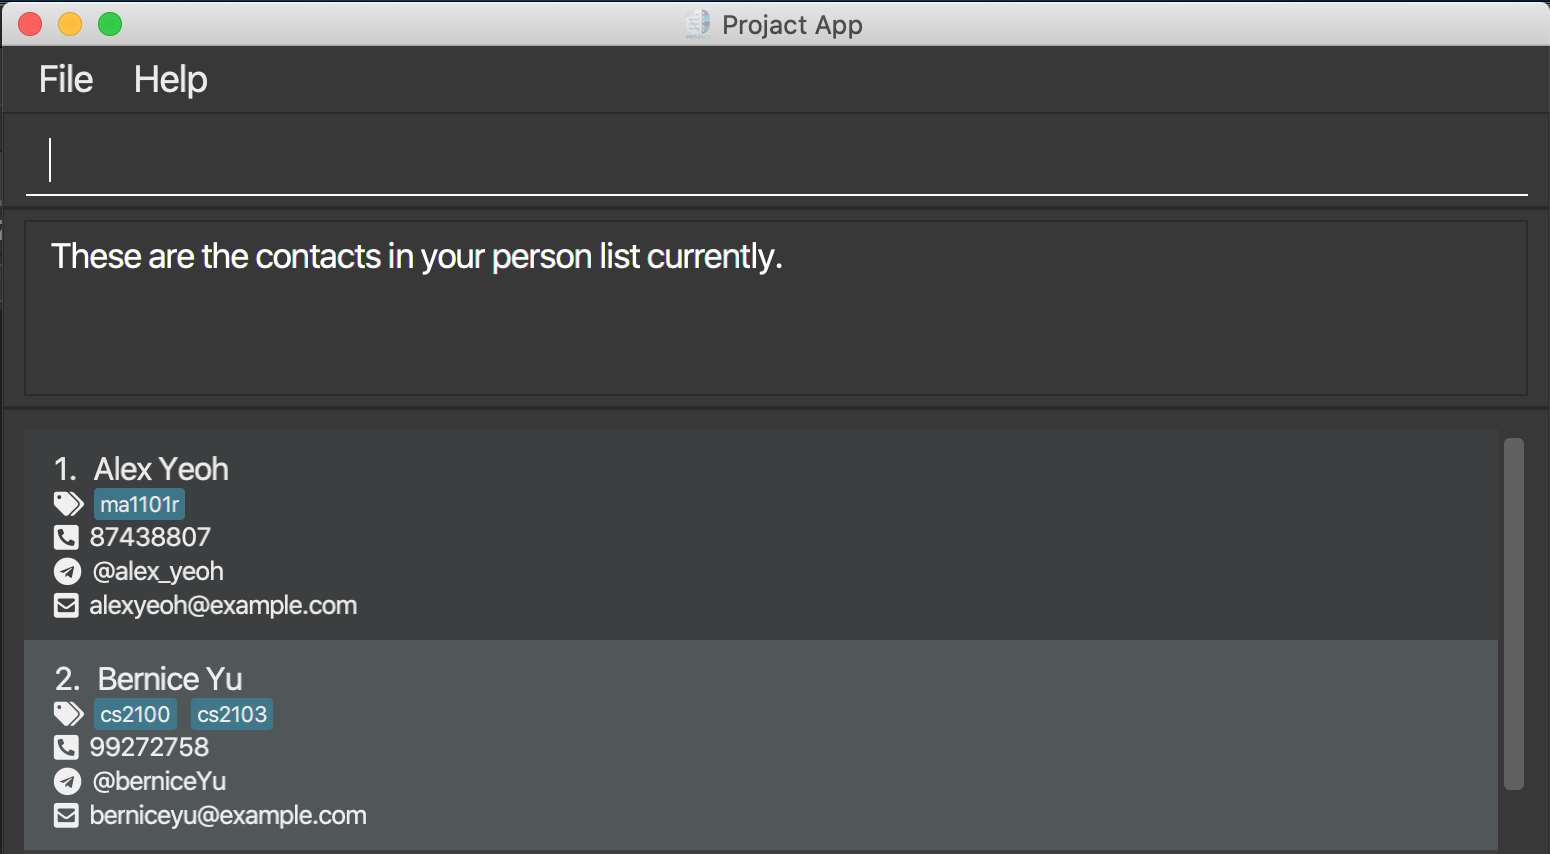
Double-click the file to start the app. The GUI similar to the below should appear in a few seconds. Note how the app contains some sample data.
-
Type the command in the command box and press Enter to execute it. e.g. typing
helpand pressing Enter will open the help window.
Some example commands you can try:-
list: Lists all contacts in the person list. -
addn/John Doe p/98765432 e/johnd@example.com ta/john_doe123: Adds a contact namedJohn Doeto the person list. -
tagaddt/CS210T: Adds a permanent tag to the tag list. -
delete3: Deletes the 3rd contact shown in the current person list. -
tagdelete1: Deletes the tag of index 1 in the tag list. -
clear: Deletes all contacts in the person list. -
exit: Exits the app.
-
-
Refer to the Features below for details of each command.
Features
![]() Notes about the command format:
Notes about the command format:
-
Words in
UPPER_CASEare the parameters to be supplied by the user.
e.g. inadd n/NAME,NAMEis a parameter which can be used asadd n/John Doe. -
Items in square brackets are optional.
e.gn/NAME [t/TAG]can be used asn/John Doe t/friendor asn/John Doe. -
Items with
… after them can be used multiple times including zero times.
e.g.[t/TAG]…can be used ast/friend,t/friend t/familyetc. -
Parameters can be in any order.
e.g. if the command specifiesn/NAME p/PHONE_NUMBER,p/PHONE_NUMBER n/NAMEis also acceptable. -
INDEXrefers to the contact’s position inlistor the tag’s position intaglist.INDEXmust be a positive integer number!
General Features
Viewing help : help
Hello! Do you need help using Projact? Enter the command help to access our user guide for more information!
Format: help

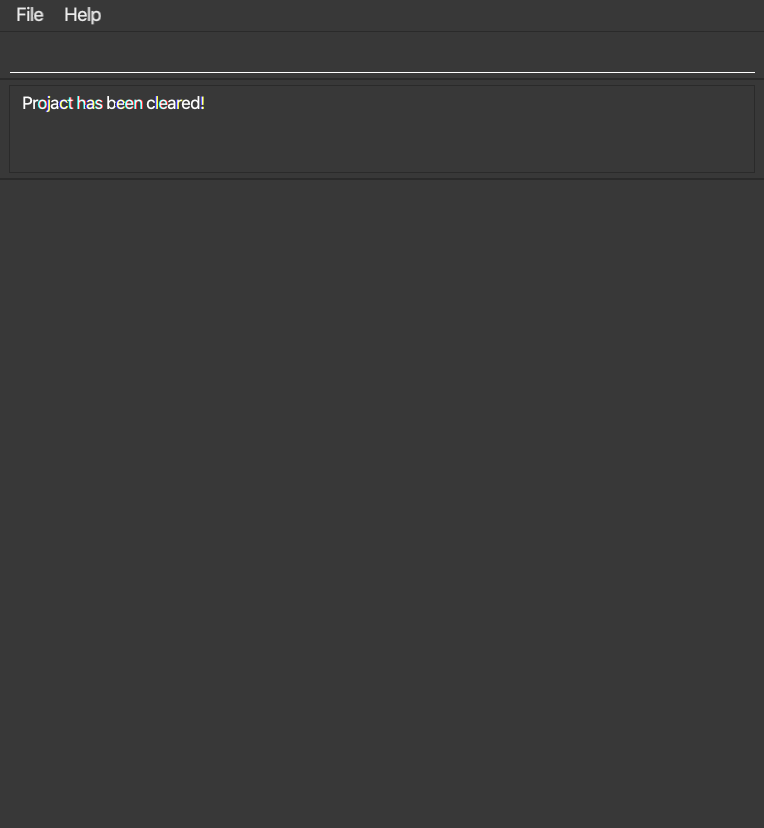
Clearing all entries : clear
Would you like to delete all the current contacts and tags in Projact? Just use the ‘clear’ command!
Format: clear
Exiting the program : exit
The Projact application will close automatically with this command.
Format: exit
Saving the data
Projact’s data is saved to your hard disk automatically if there are any changes so there is no need to save manually. Don’t worry, the data you have entered in previously will be automatically loaded when you reopen Projact the next time.
Contact Features
Adding a contact: add
Have you made a new friend? Great! Use the add command to add a new contact into the list.
Format: add n/NAME p/PHONE_NUMBER e/EMAIL ta/TELEGRAM_ADDRESS [t/TAG]…
![]() Warning:
Warning:
-
No two contacts can have the same name.
-
Phone numbers must be 7 to 15 digits long.
-
Telegram addresses must be 5-32 characters long.
-
Emails must follow the format local-part@domain.extension (e.g. test@test.com)
![]() Tip:
Tip:
-
Numbers and underscores are allowed in a person’s name so that you could set it to your contact’s nickname.
-
A contact can be created with 0 or more tags.
-
Listed tags will be created automatically if they are not found in the tag list.
Step-By-Step Guide:
Let’s say you have a friend named Betsy Crowe that you want to add into your list of contacts.
Her email address is betsycrowe@example.com, her telegram handle is betsycr0w, her phone number is 91234567,
and she is your CS2101 classmate as well as a friend.
Step 1: First, type the add command followed by Betsy’s details as in the format below.
add n/Betsy Crowe e/betsycrowe@example.com ta/betsycr0w p/91234567 t/CS2101 t/friend
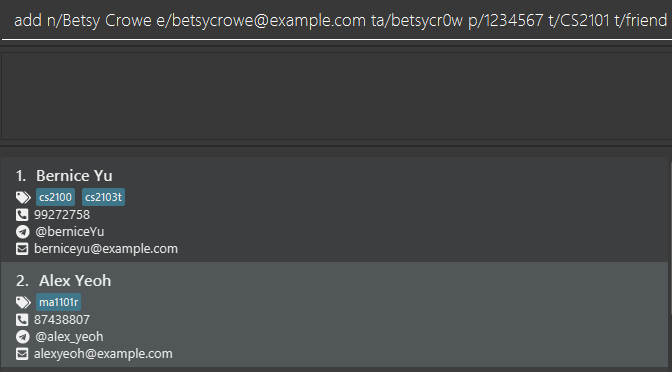
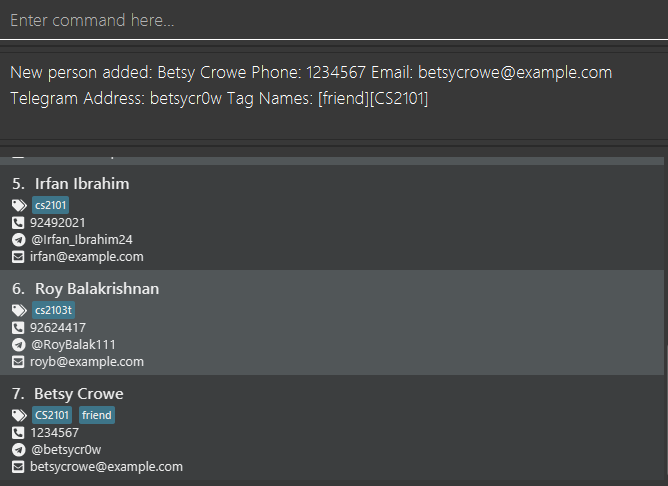
Step 2: Hit enter and she will be added at the bottom of the list of contacts.
Locating contacts by name: find
Do you have too many contacts such that you are unable to look for the contact you need?
Use our find command to look for that contact using words that his/her name contains.
Format: find KEYWORD [MORE_KEYWORDS]
![]() Warning:
Warning:
-
Only the name is searched.
-
Only full words will be matched e.g.
Hanwill not matchHans.
![]() Tip:
Tip:
-
The search is case-insensitive. e.g
hanswill matchHans -
The order of the keywords does not matter. e.g.
Hans Bowill matchBo Hans. -
Type more than one keyword to find more than one contact each time! e.g.
Hans Bowill returnHans Gruber,Bo Yang
Example Guide:
-
If you want to find
Alex Yeoh, typefind Alexorfind Yeoh. The display result will be as shown.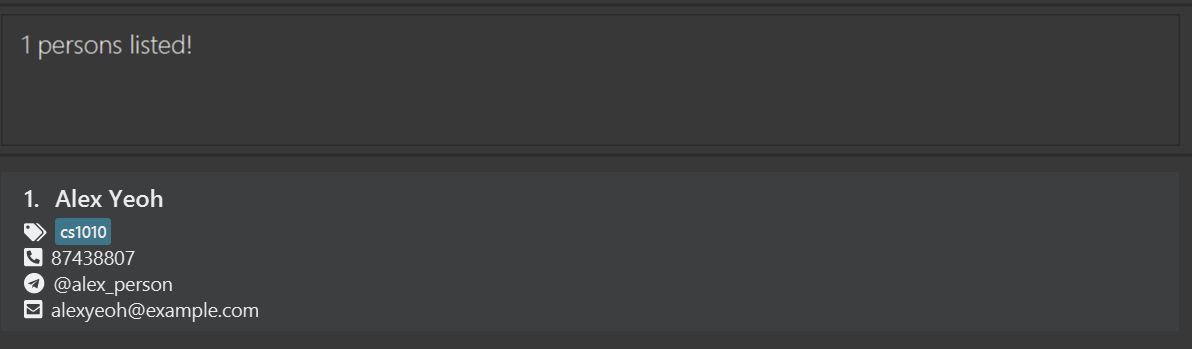
-
If you want to find both
Alex YeohandDavid Li, typefind alex david. The display result will be as shown.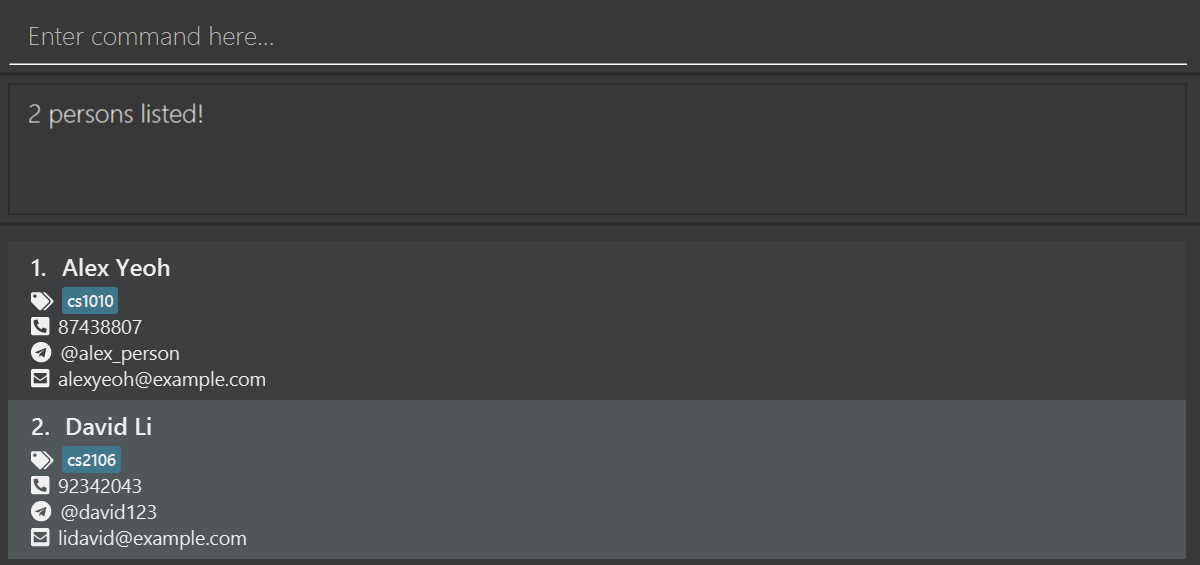
Listing all contacts : list
Want to look at all the friends you have? Me too! Use list to view all the contacts you have added so far.
Format: list
Sort contacts by name: sort
Dislike how the current list of contacts is displayed? Sort the names in alphanumerical order by
typing a single sort word on the command line.
![]() Warning:
Warning:
-
Do note that
sortcommand does not sort the contact list displayed withfindcommand! -
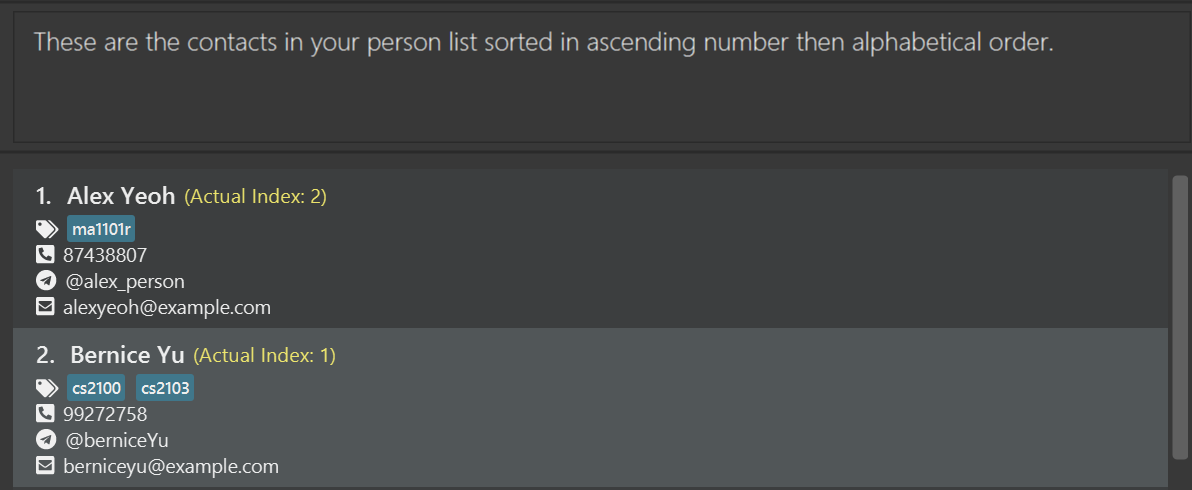
Only edit the contact based on the Actual Index as displayed!
-
Actual Index is not shown if it is the same as the displayed index (white) in the sorted list
![]() Tip:
Tip:
- Do you wish to get back to the previous list? No worries, this sorted list is not permanent! Simply enter
liston the command line to get back to the chronological order.
Format: sort
Editing a contact : edit
Oops! Accidentally misentered your contact’s details? Fret not! The edit command allows you to edit a single field
(or multiple fields) as needed!
Format: edit INDEX [n/NAME] [p/PHONE_NUMBER] [e/EMAIL] [ta/TELEGRAM_ADDRESS] [t/TAG]…
![]() Warning:
Warning:
-
The index must be a positive integer 1, 2, 3, …
-
At least one of the optional fields must be provided.
-
When editing tags, the existing tags of the contact will be removed i.e adding of tags is not cumulative.
-
If you have just used
sort, follow theActual Indexas displayed to edit the particular contact you want.
![]() Tip:
Tip:
- You can remove all the contact’s tags by typing
t/without specifying any tags after it.
Example Guide:
-
listfollowed byedit 1 ta/berniceYu123edits the telegram handle of the first contact in the person list fromberniceYutoberniceYu123Step 1: This is the original list after using
listcommand.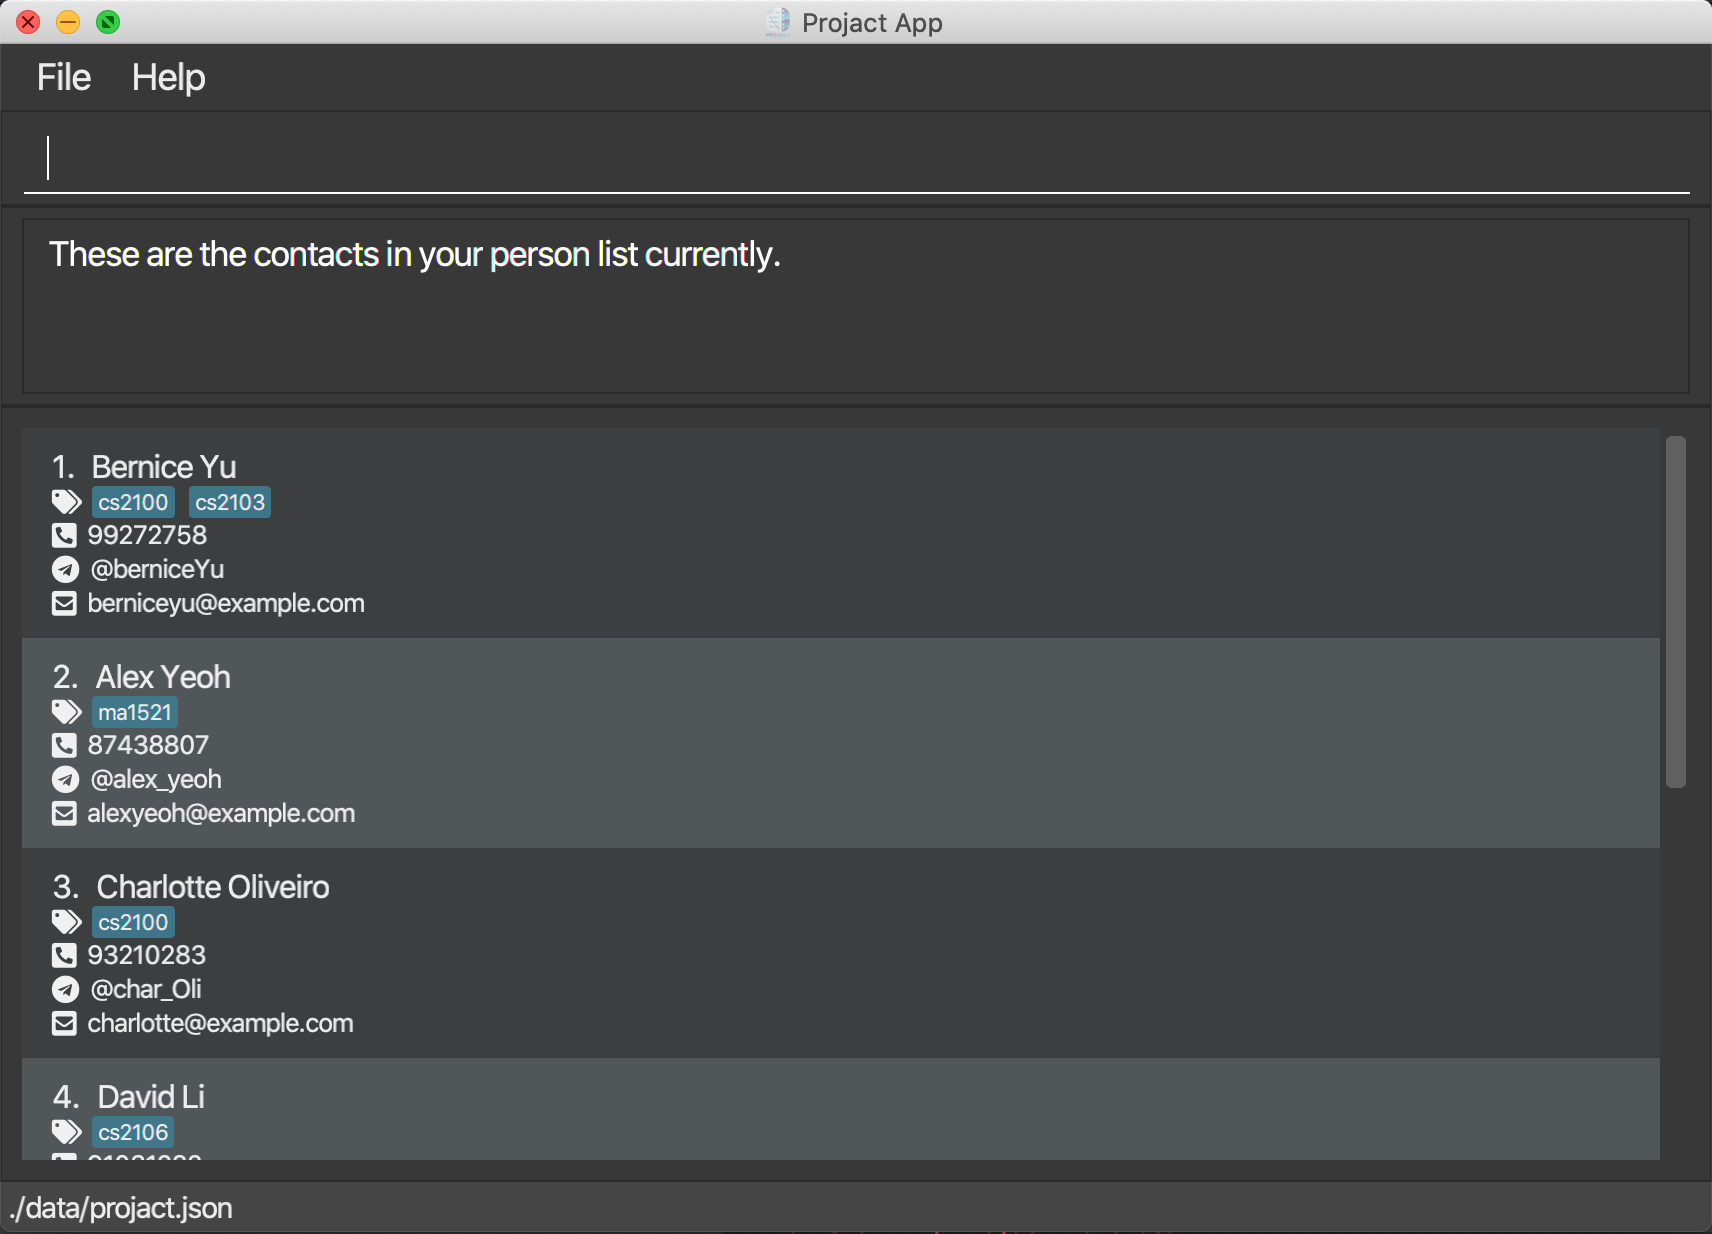
Step 2: Type in
edit 1 ta/berniceYu123and hit enter. You should wee that her telegram handle has changed.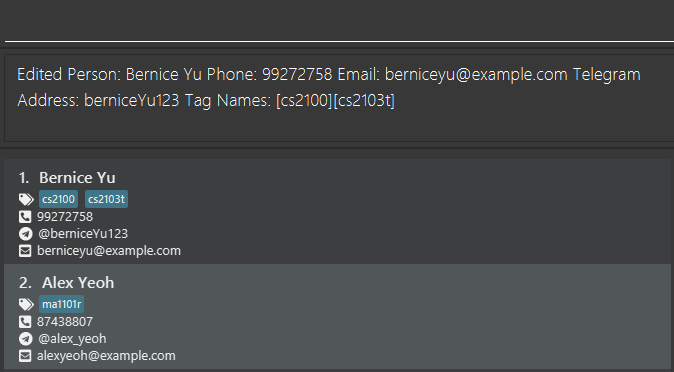
-
find Irfanfollowed byedit 1 t/cs2100edits the first contact in the results of thefindcommand to have thecs2100tag.Step 1: This is the list after using the
find Irfancommand.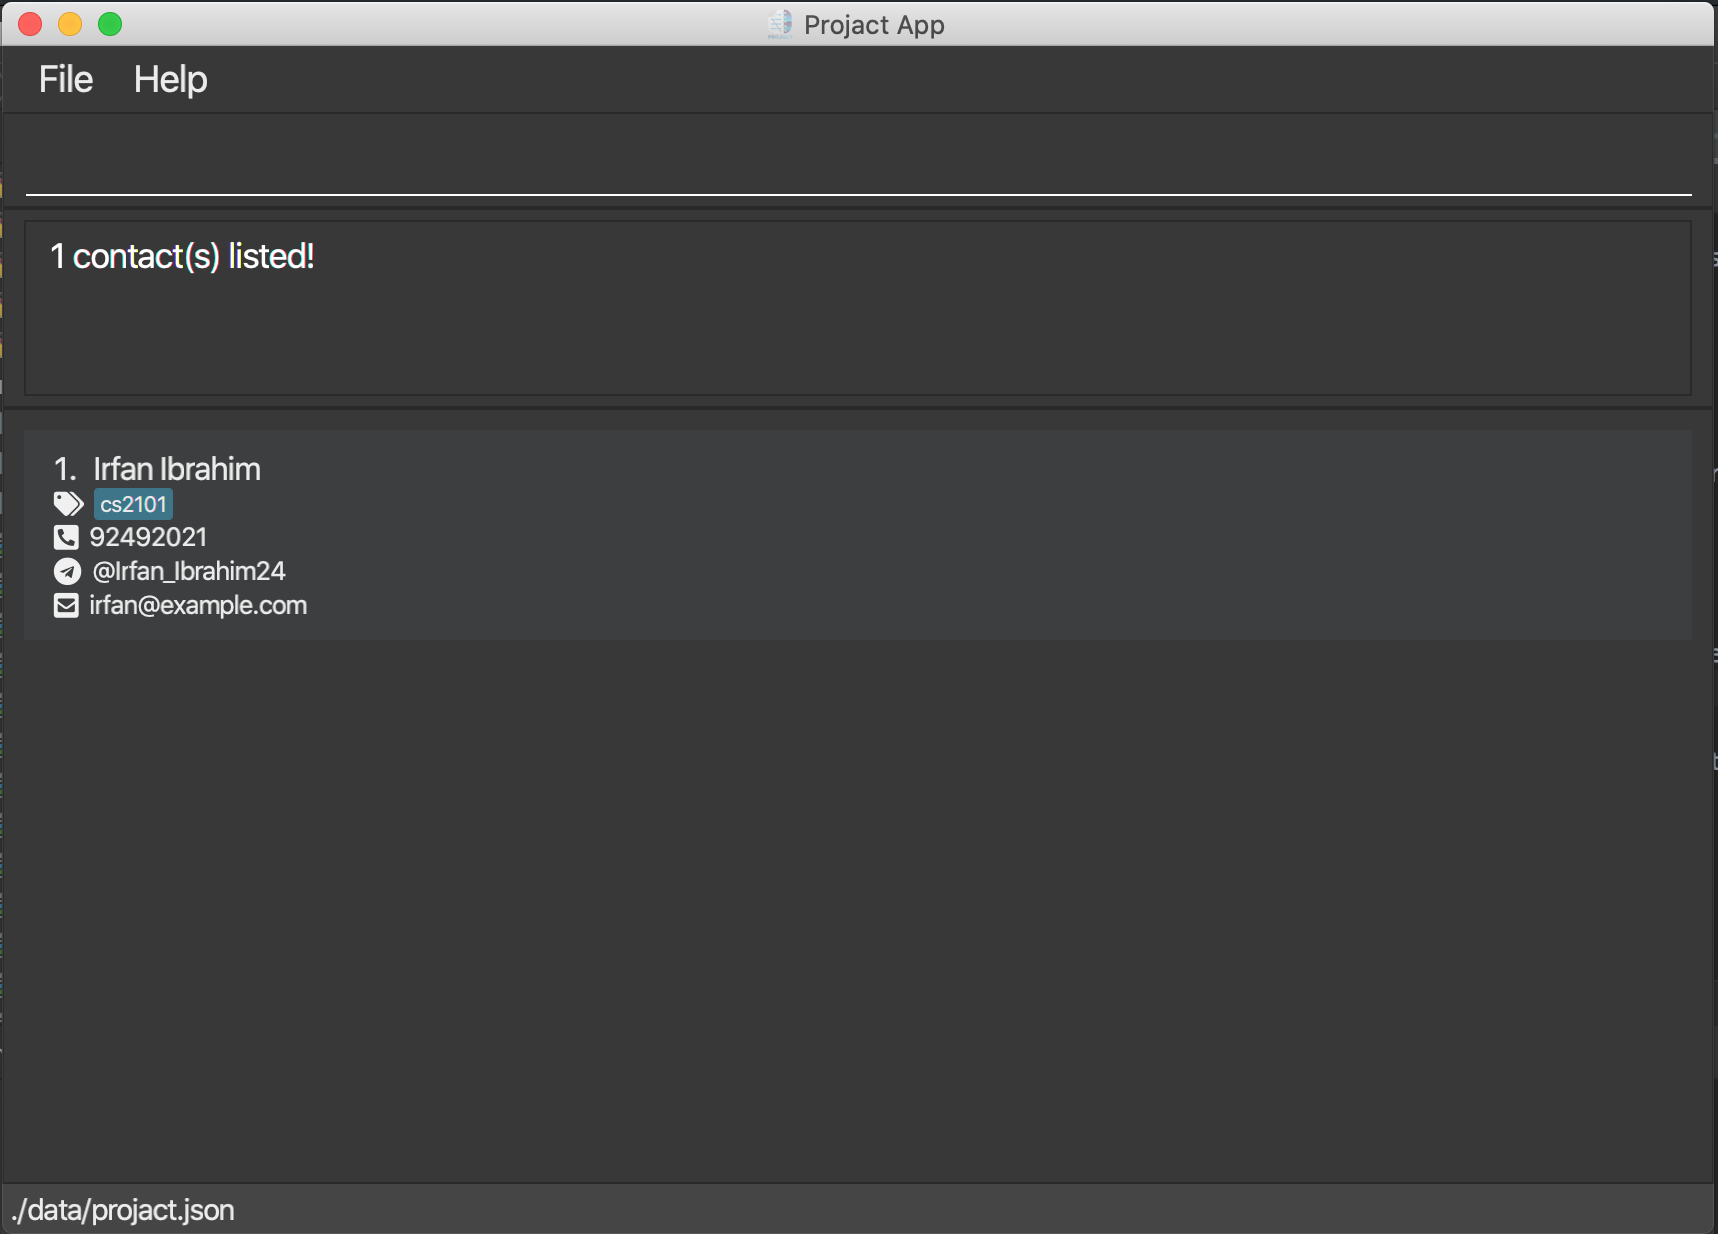
Step 2: After entering
edit 1 t/cs2100, Irfan now has thecs2100tag.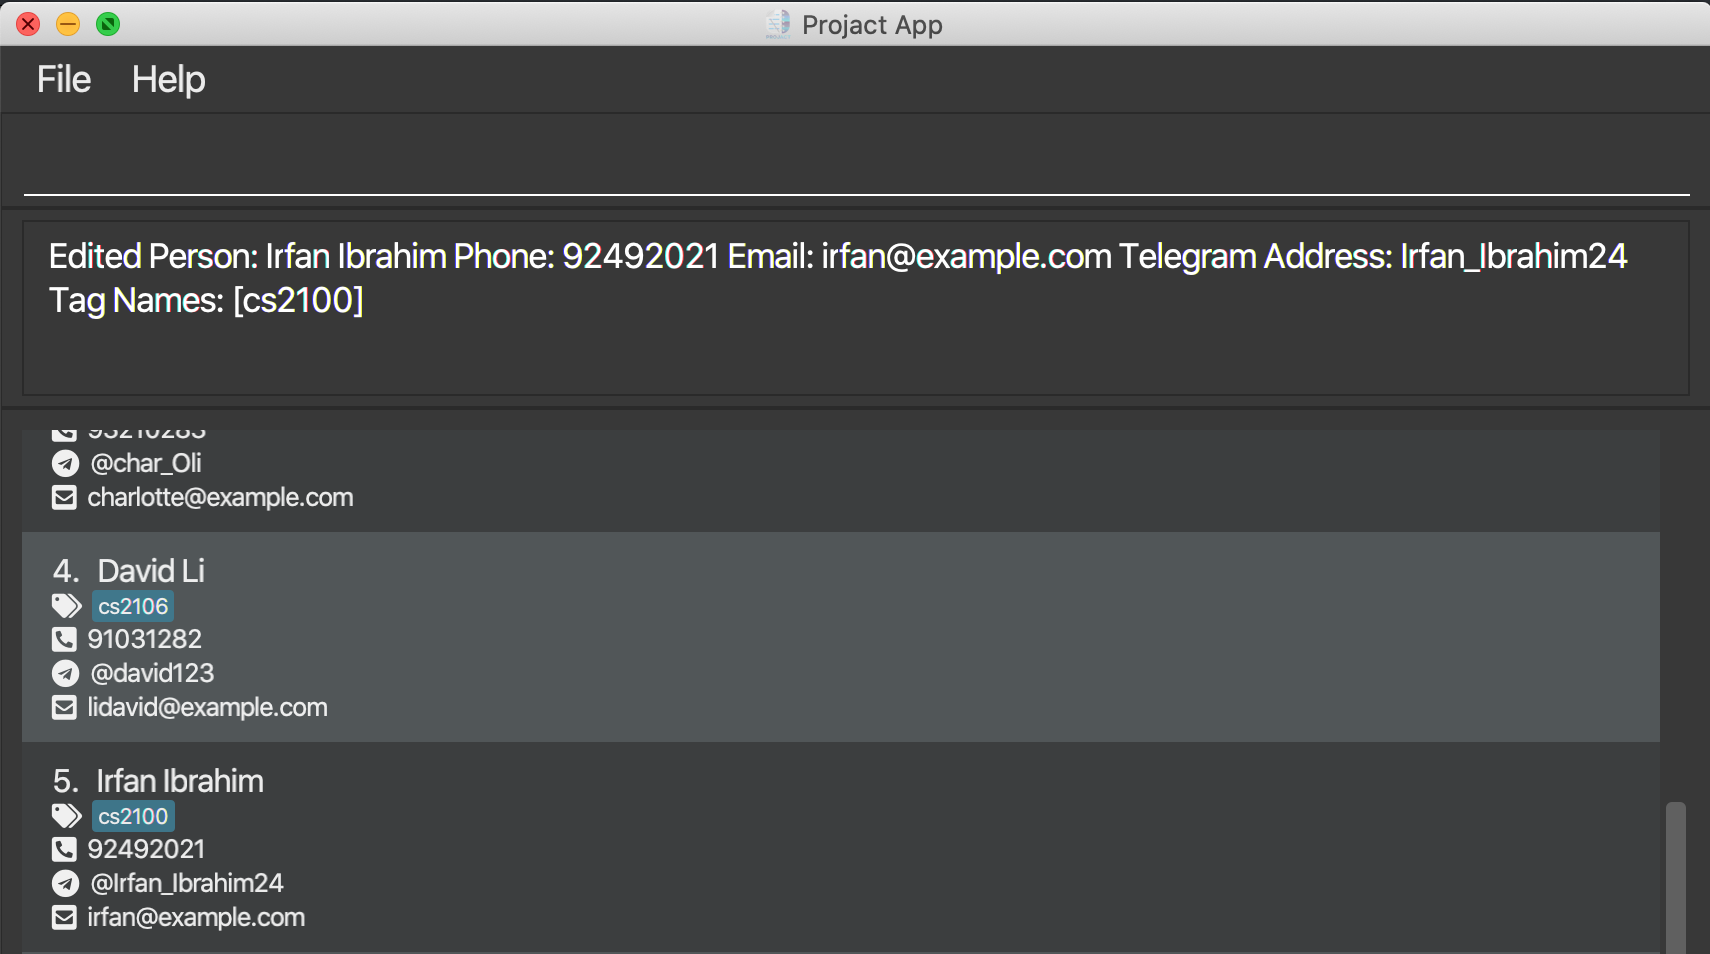
-
sortfollowed byedit 1 n/Bella Yuedits the name of the first contact in the original contact list toBella YuStep 1: This is the list after using the
sortcommand.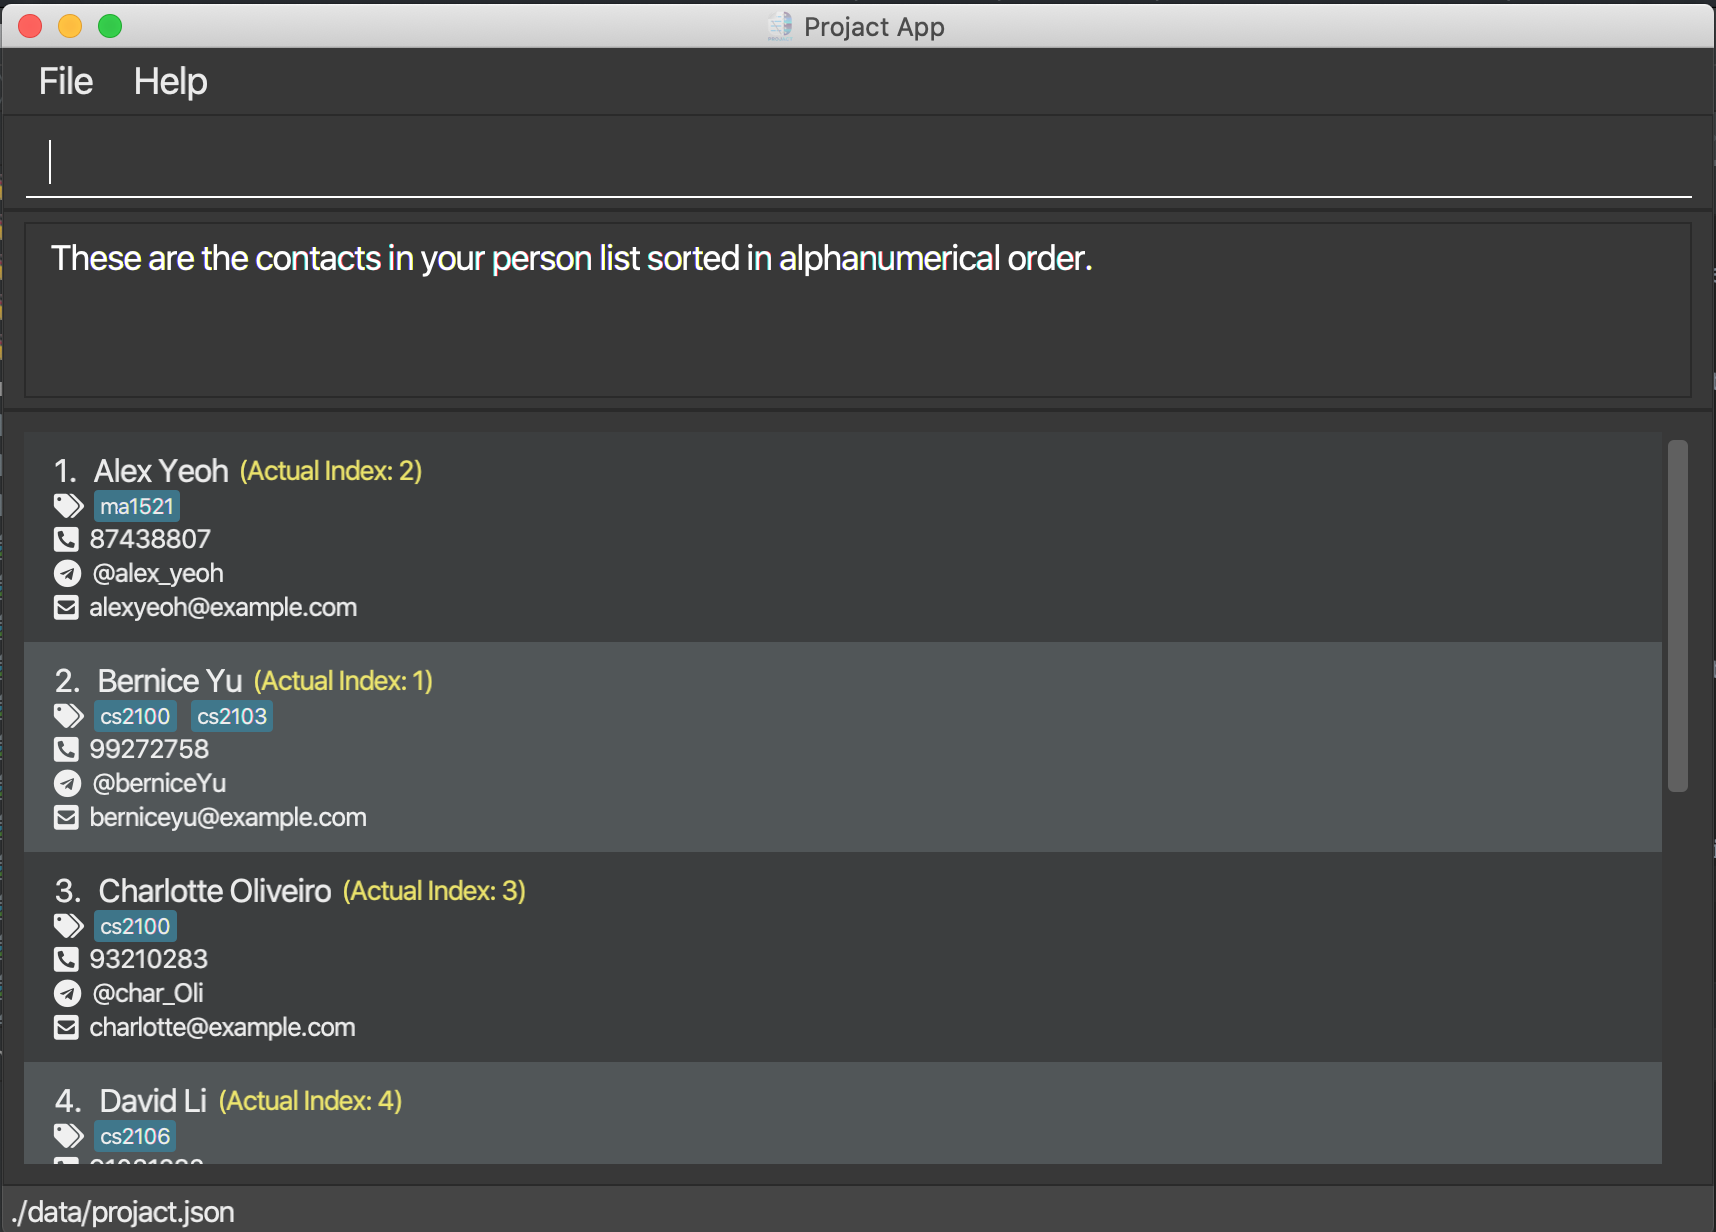
Step 2: After entering
edit 1 n/Bella Yu, the name of the first contact Bernice, instead of Alex, is changed to Bella.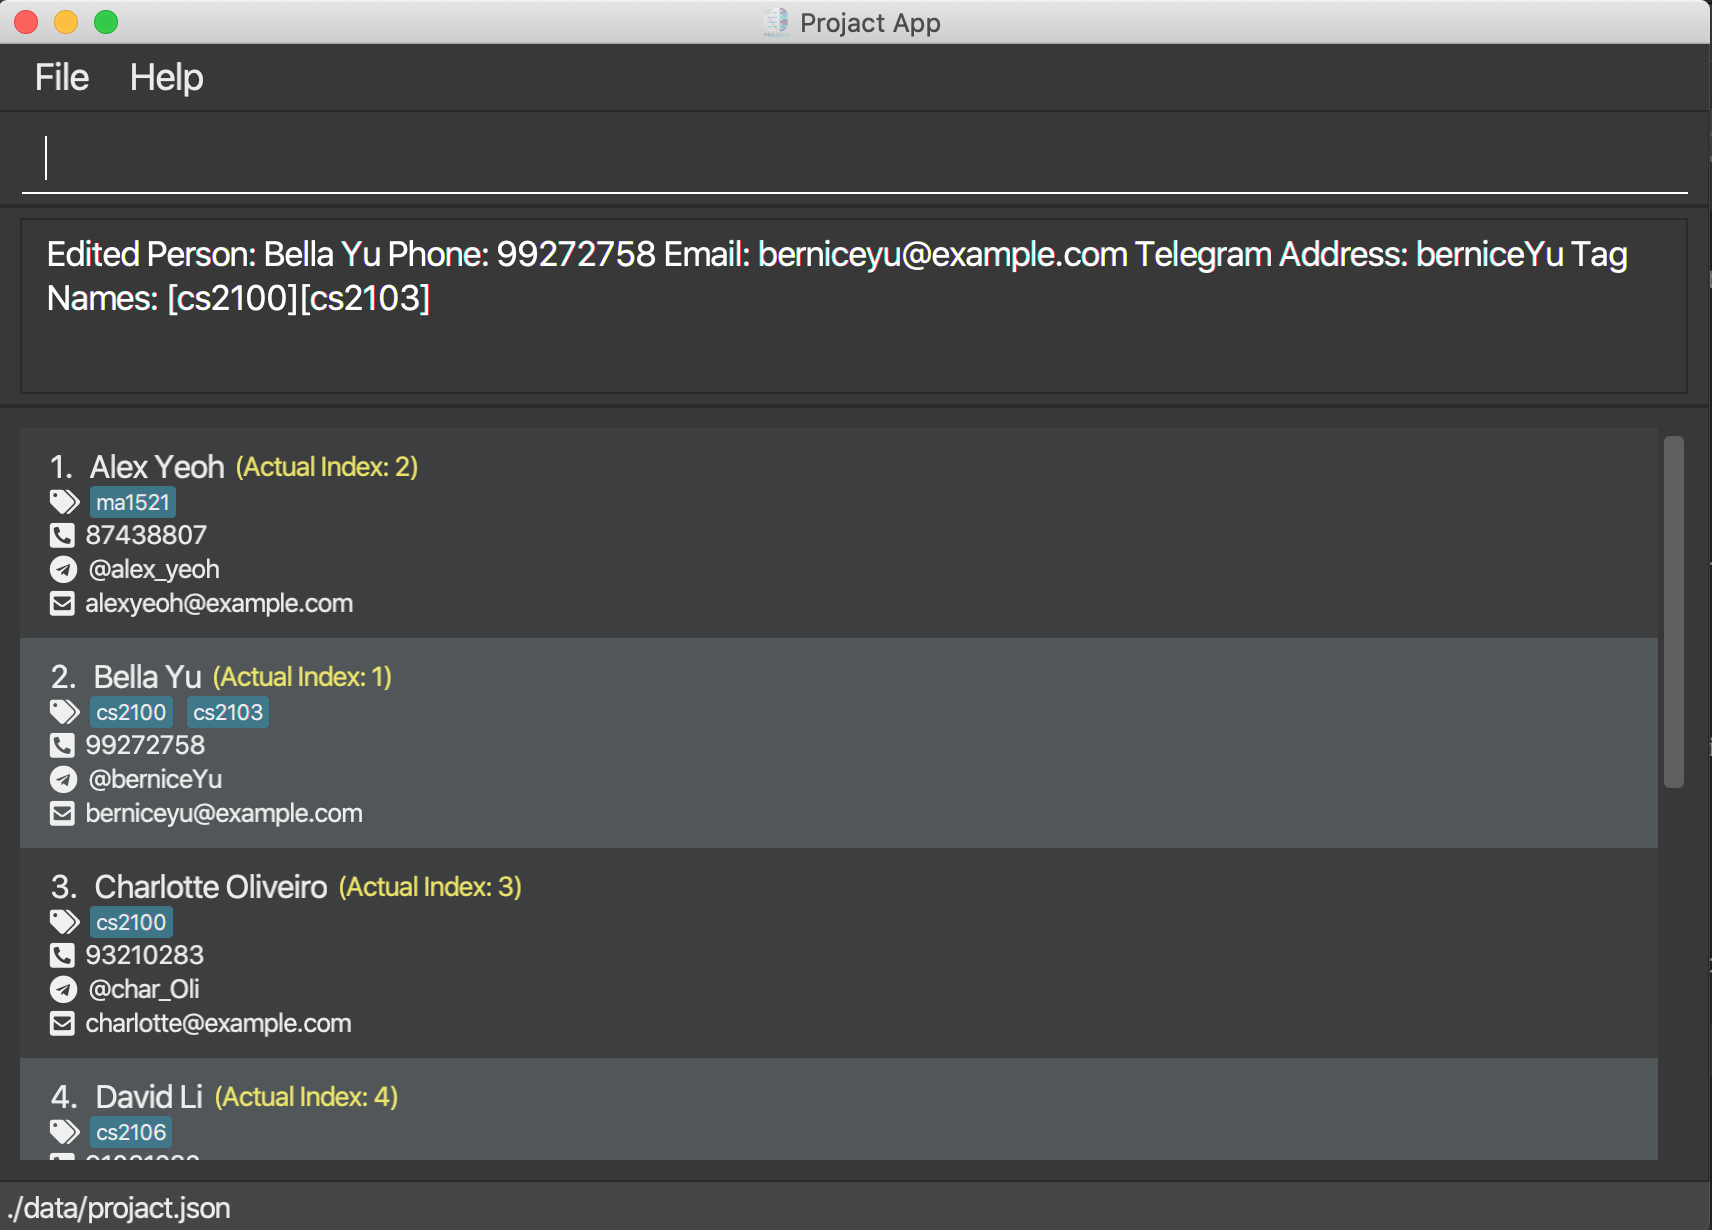
Deleting a contact : delete
Want to remove a contact? Simply use our delete command with the index INDEX of that contact shown in the displayed contact list!
Format: delete INDEX
![]() Warning:
Warning:
-
If you have just used
sort, follow theActual Indexas displayed to delete the particular contact you want! -
Deleting the contact does not delete the respective tag(s). The name will be removed from the tag only!
Example Guide:
-
listfollowed bydelete 2deletes the second contact in the person list.Step 1: This is the original list after using
listcommand.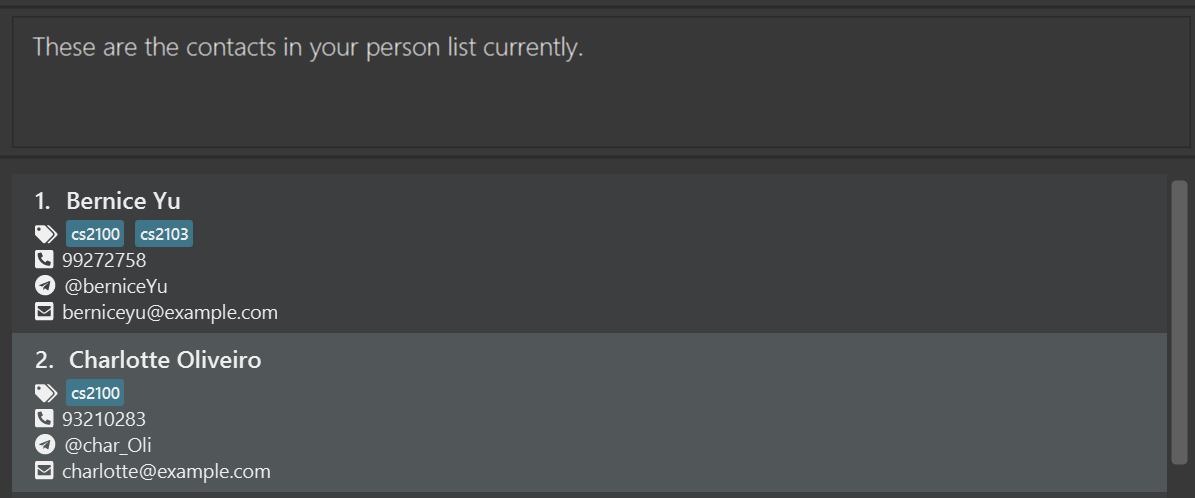
Step 2: After entering
delete 2, the contact Charlotte is deleted.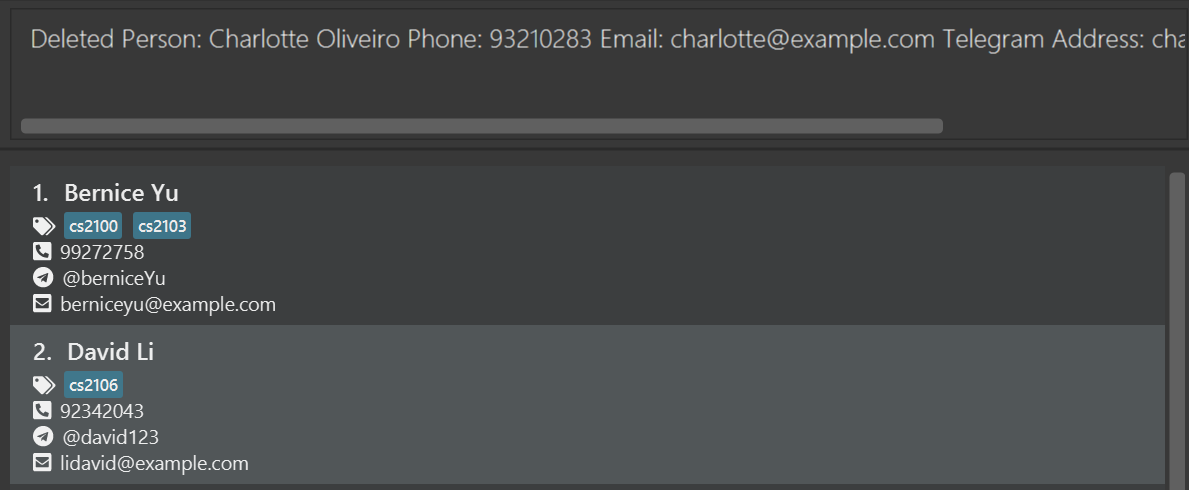
-
find Irfanfollowed bydelete 1deletes the first contact in the results of thefindcommand.Step 1: This is the list after using the
find Irfancommand.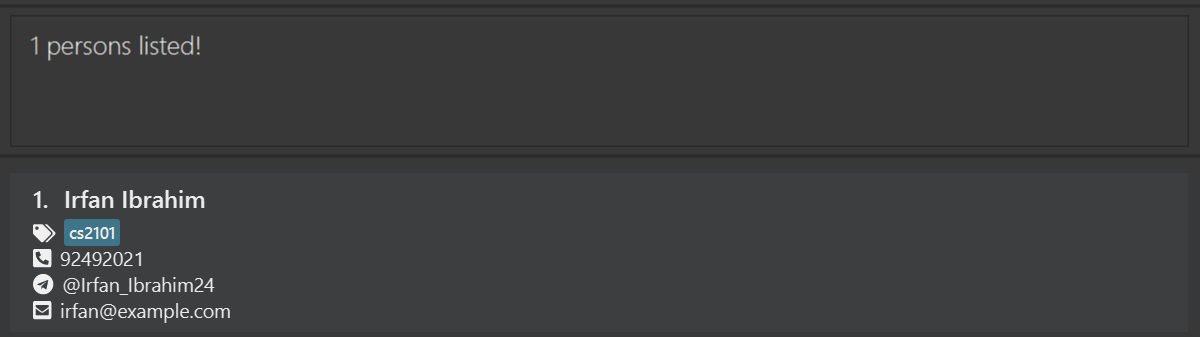
Step 2: After entering
delete 1, the contact Irfan is deleted.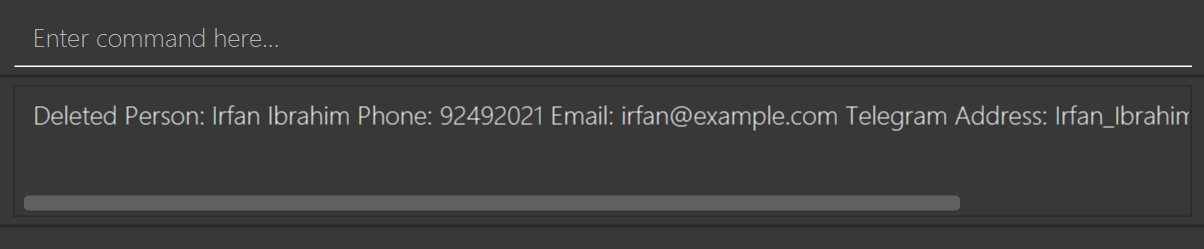
-
sortfollowed bydelete 1deletes the first contact in the original contact list.Step 1: This is the list after using the
sortcommand.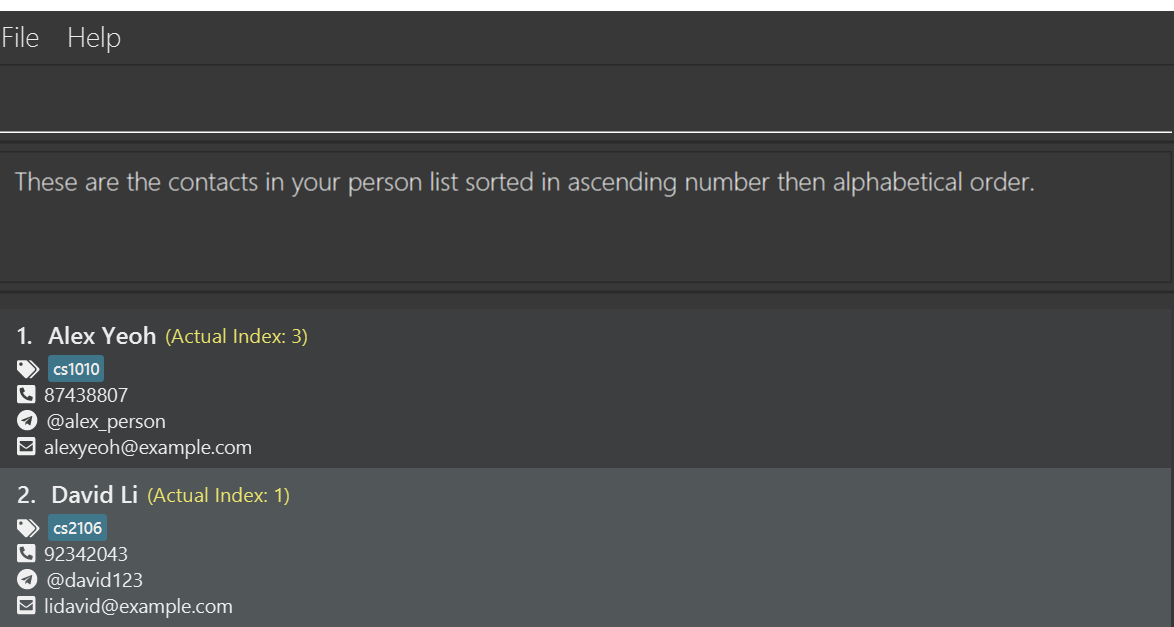
Step 2: After entering
delete 1, the contact David is deleted, not Alex Yeoh as the actual index of Alex is 3.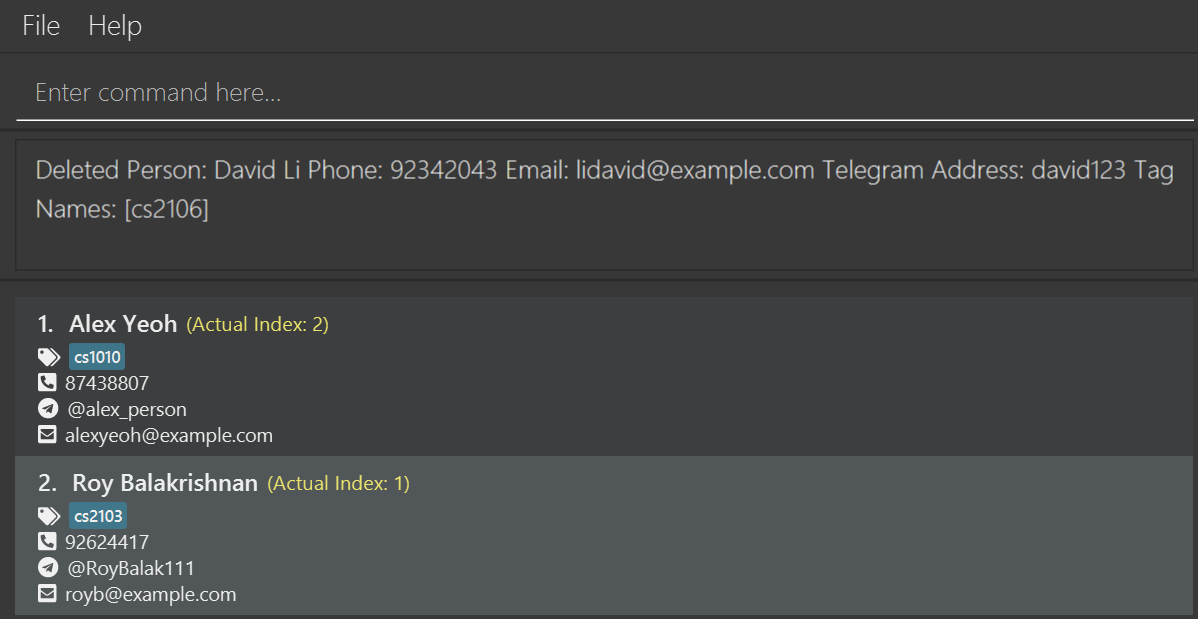
Tag Features
Adding a tag : tagadd
Do you want to add a tag without any contacts? Use the tagadd command to achieve this!
Format: tagadd t/TAG
- Creates a specified tag without the need of a contact.
- Tag will not be created if it already exists in the tag list.
Examples:
-
tagadd t/personalcreates a tag named personal without any contact being assigned to the tag.
Step-By-Step Guide:
Step 1: Start on the taglist view.
Step 2: Enter the tagadd command and the new tag name t/personal.
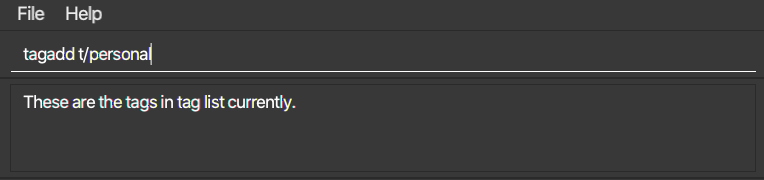
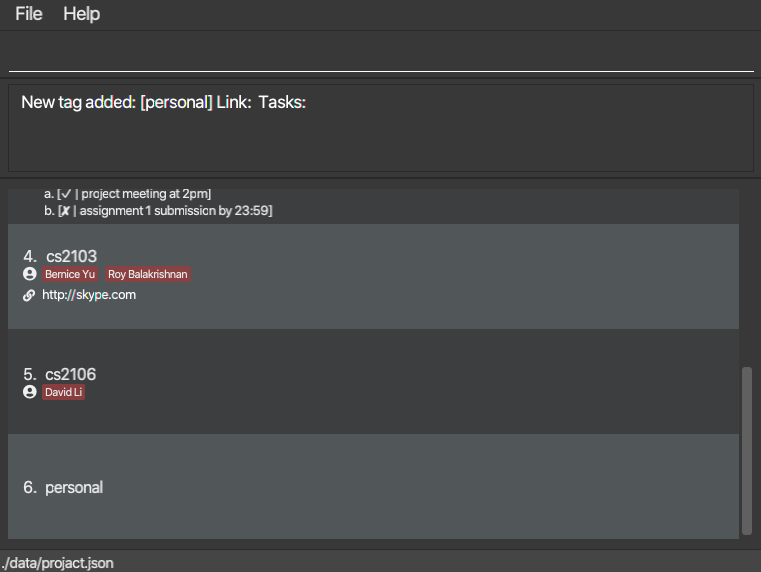
Step 3: Press enter, and the tag is now added after the last displayed tag cs2106.
Locating tags by name: tagfind
Searching for a tag? Use the tagfind command to search for a tag that matches the given keywords.
Format: tagfind KEYWORD [MORE_KEYWORDS]
![]() Warning:
Warning:
-
Only the name of the tag is searched.
-
Only full words will be matched e.g.
Teamwill not matchTeam1
![]() Tip:
Tip:
-
The search is case-insensitive. e.g
cs2101will matchCS2101 -
The order of the keywords does not matter. e.g.
Team1 GroupAwill matchGroupA Team1 -
Contacts matching at least one keyword will be returned (i.e.
ORsearch). e.g.Team Awill returnTeam B,Group A
Step-By-Step Guide:
Step 1: If you want to find both cs2100 and cs2101, type tagfind cs2100 cs2101.
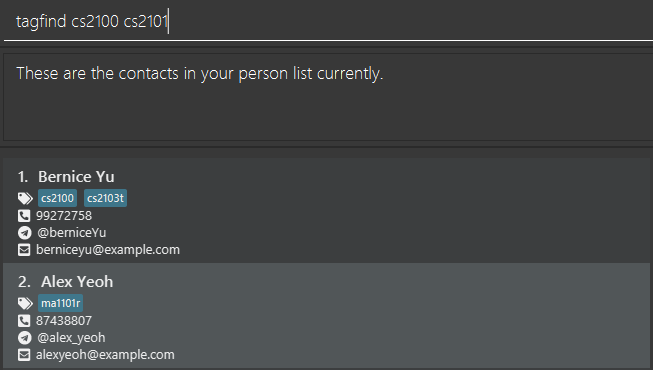
Step 2: Hit enter and the tags that match either of the keywords will be displayed.
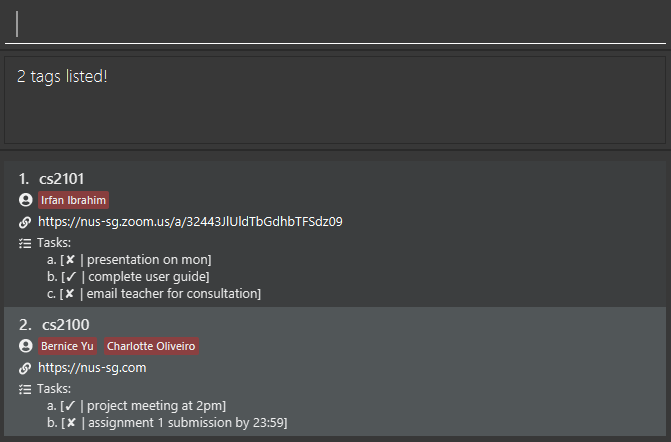
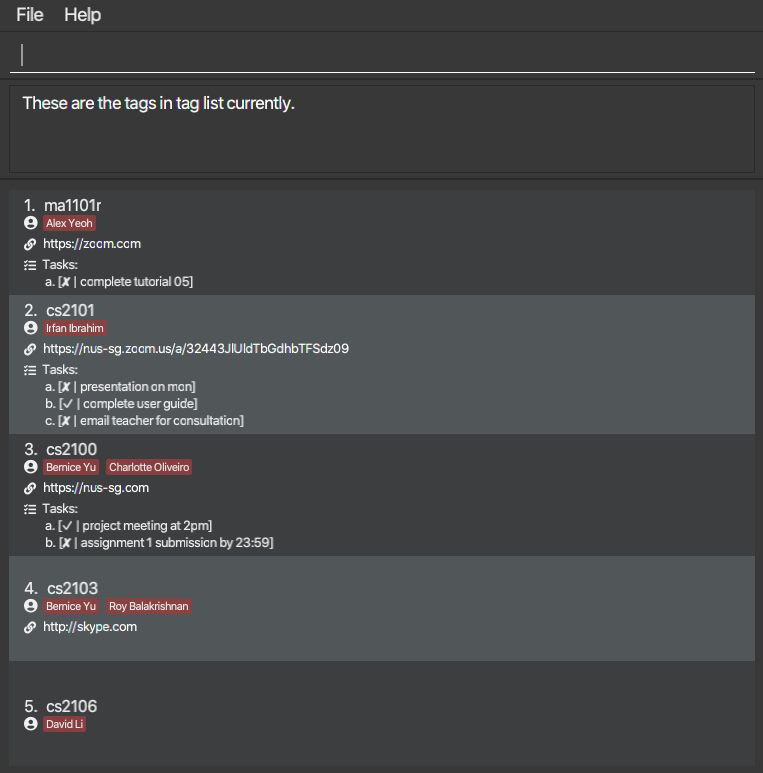
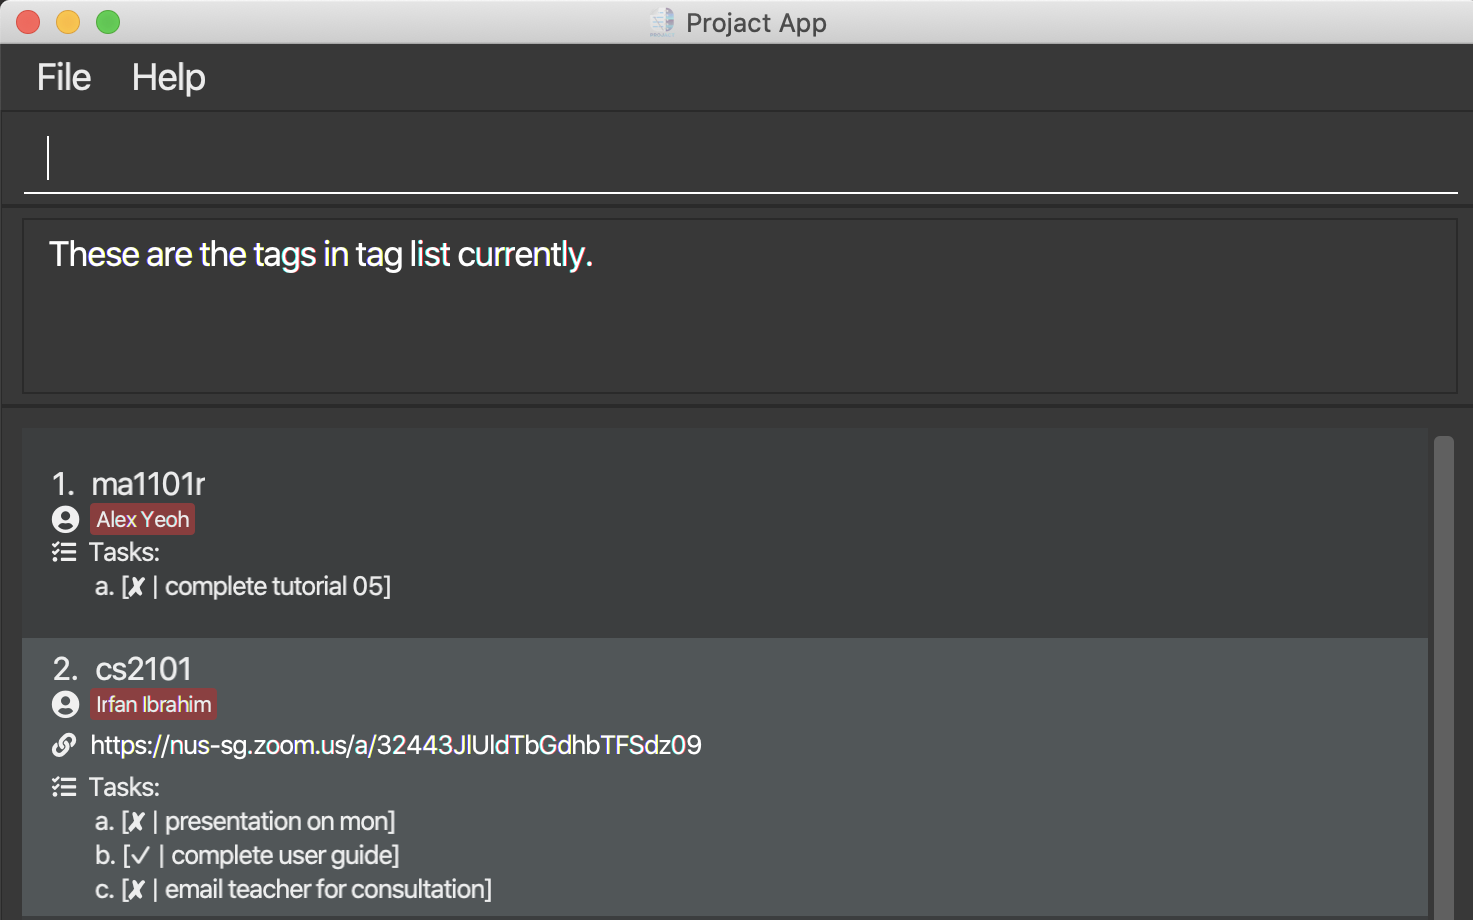
Listing all tags: taglist
Want to see all the tags you have added? Display them with simply the taglist command.
Format: taglist
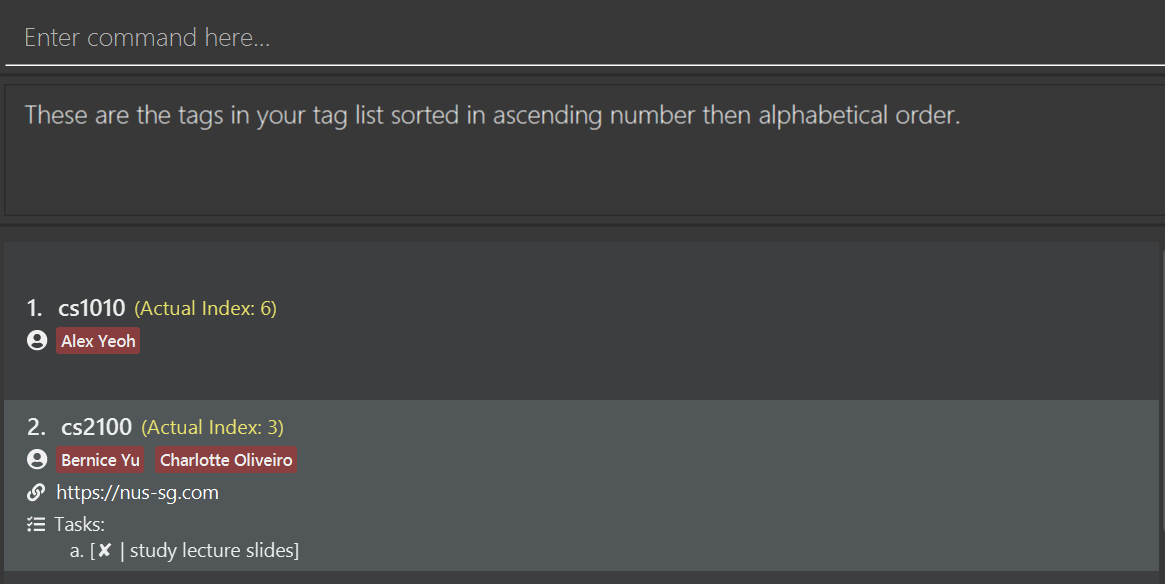
Sorting tags by tag name: tagsort
Dislike how the current list of tags is displayed?
Sort the tags by their names in alphanumerical order by typing a single tagsort word on the command line.
![]() Note:
Note:
-
Do note that
tagsortcommand does not sort the tag list displayed aftertagfindcommand! -
Only edit the tag based on the Actual Index as displayed! (Similar to
sortcommand!) -
Actual Index is not shown if it is the same as the displayed index (white) in the sorted list
![]() Tip:
Tip:
- Do you wish to get back to the previous tag list? No worries, this sorted tag list is not permanent! Simply enter
tagliston the command line to get back to the chronological order.
Format: tagsort
Editing a tag : tagedit
Made a mistake while adding tags? We got you! Here’s a simple tagedit command to quickly fix your typos.
Format: tagedit INDEX t/TAG_NAME
![]() Warning:
Warning:
-
The index must be a positive integer 1, 2, 3, …
-
Contact(s) who had the old tag will also have it renamed.
-
If you have just used
tagsort, follow theActual Indexas displayed to edit the particular tag you want.
Example Guide:
-
taglistfollowed by thetagedit 1 t/ma1521edits the name of the first tag in the list toma1521. Step 1: Key intaglistand hit enter to display all the tags.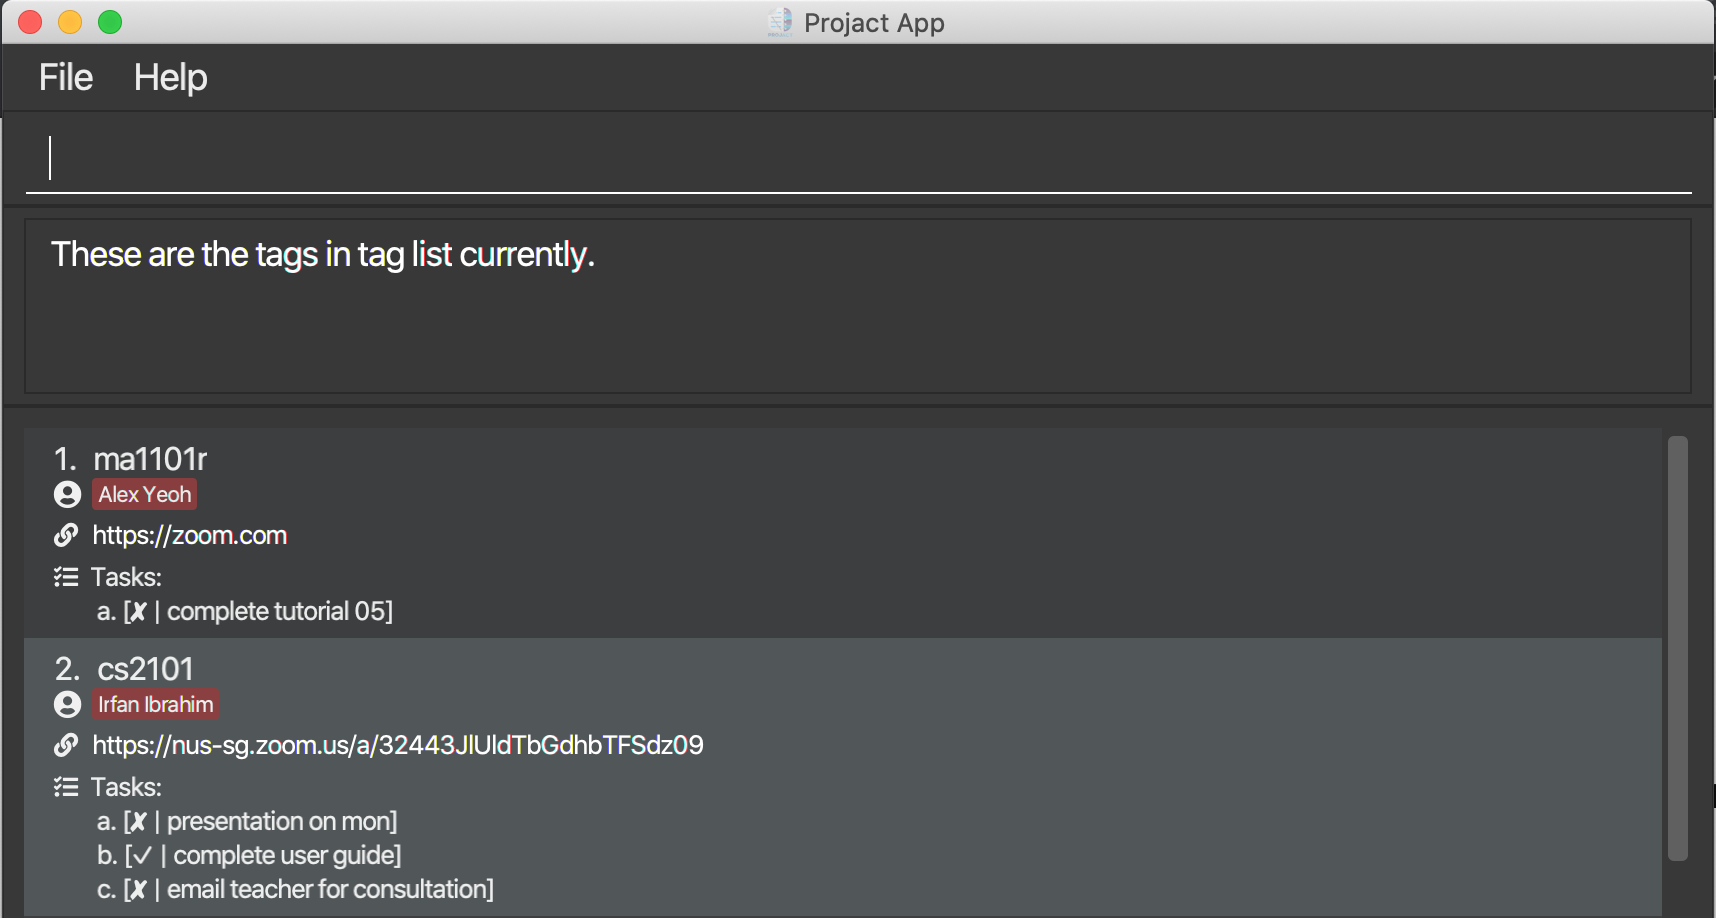
Step 2: Key in tagedit 1 t/ma1521 and hit enter.
-
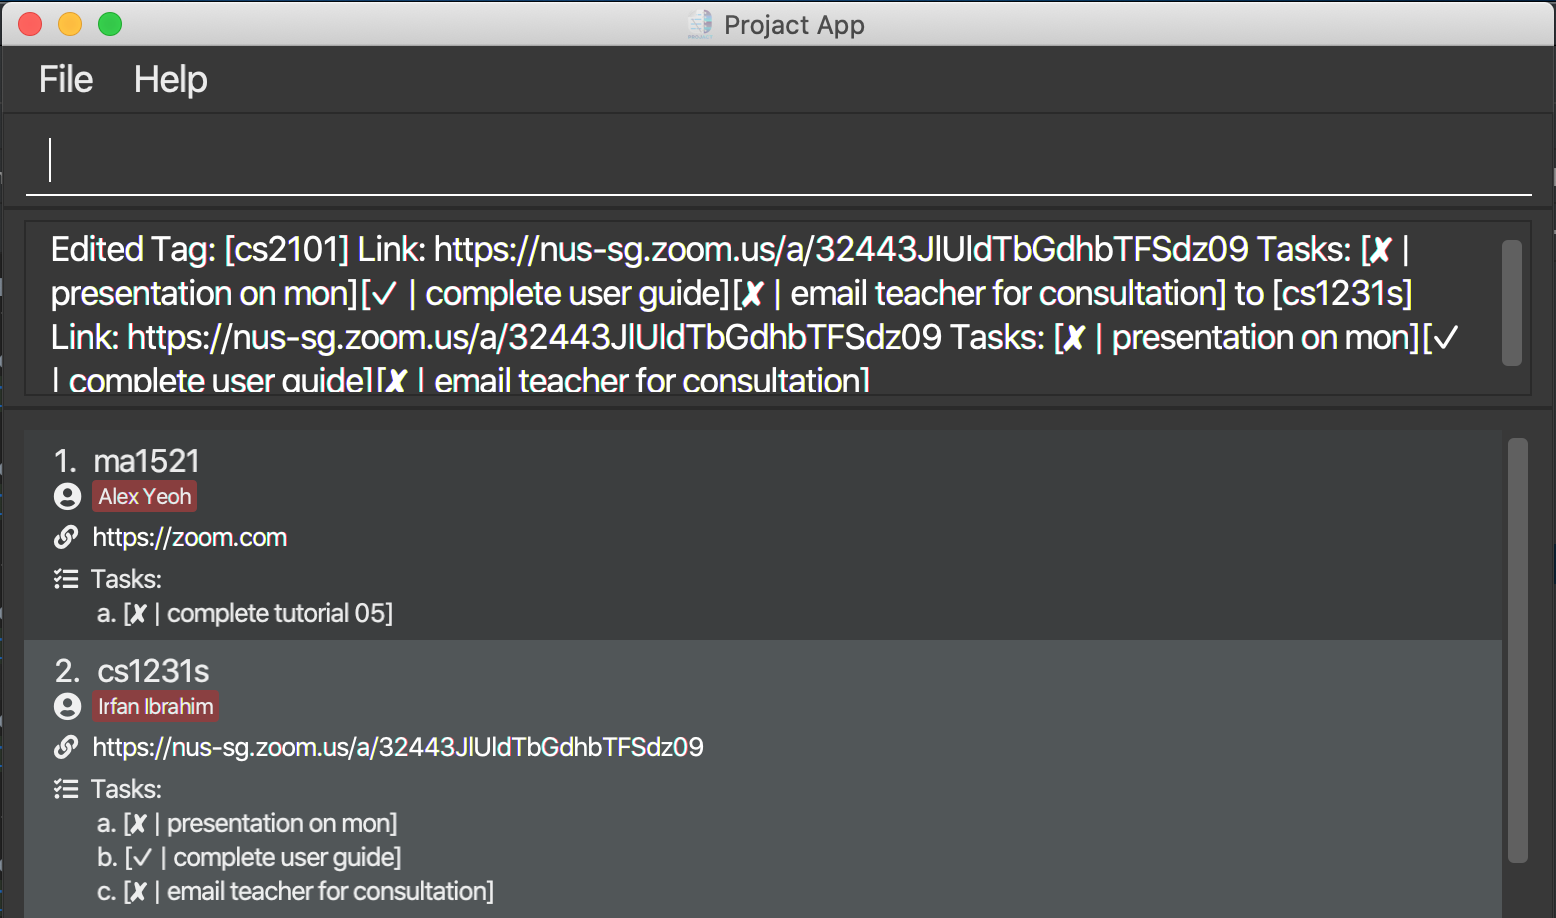
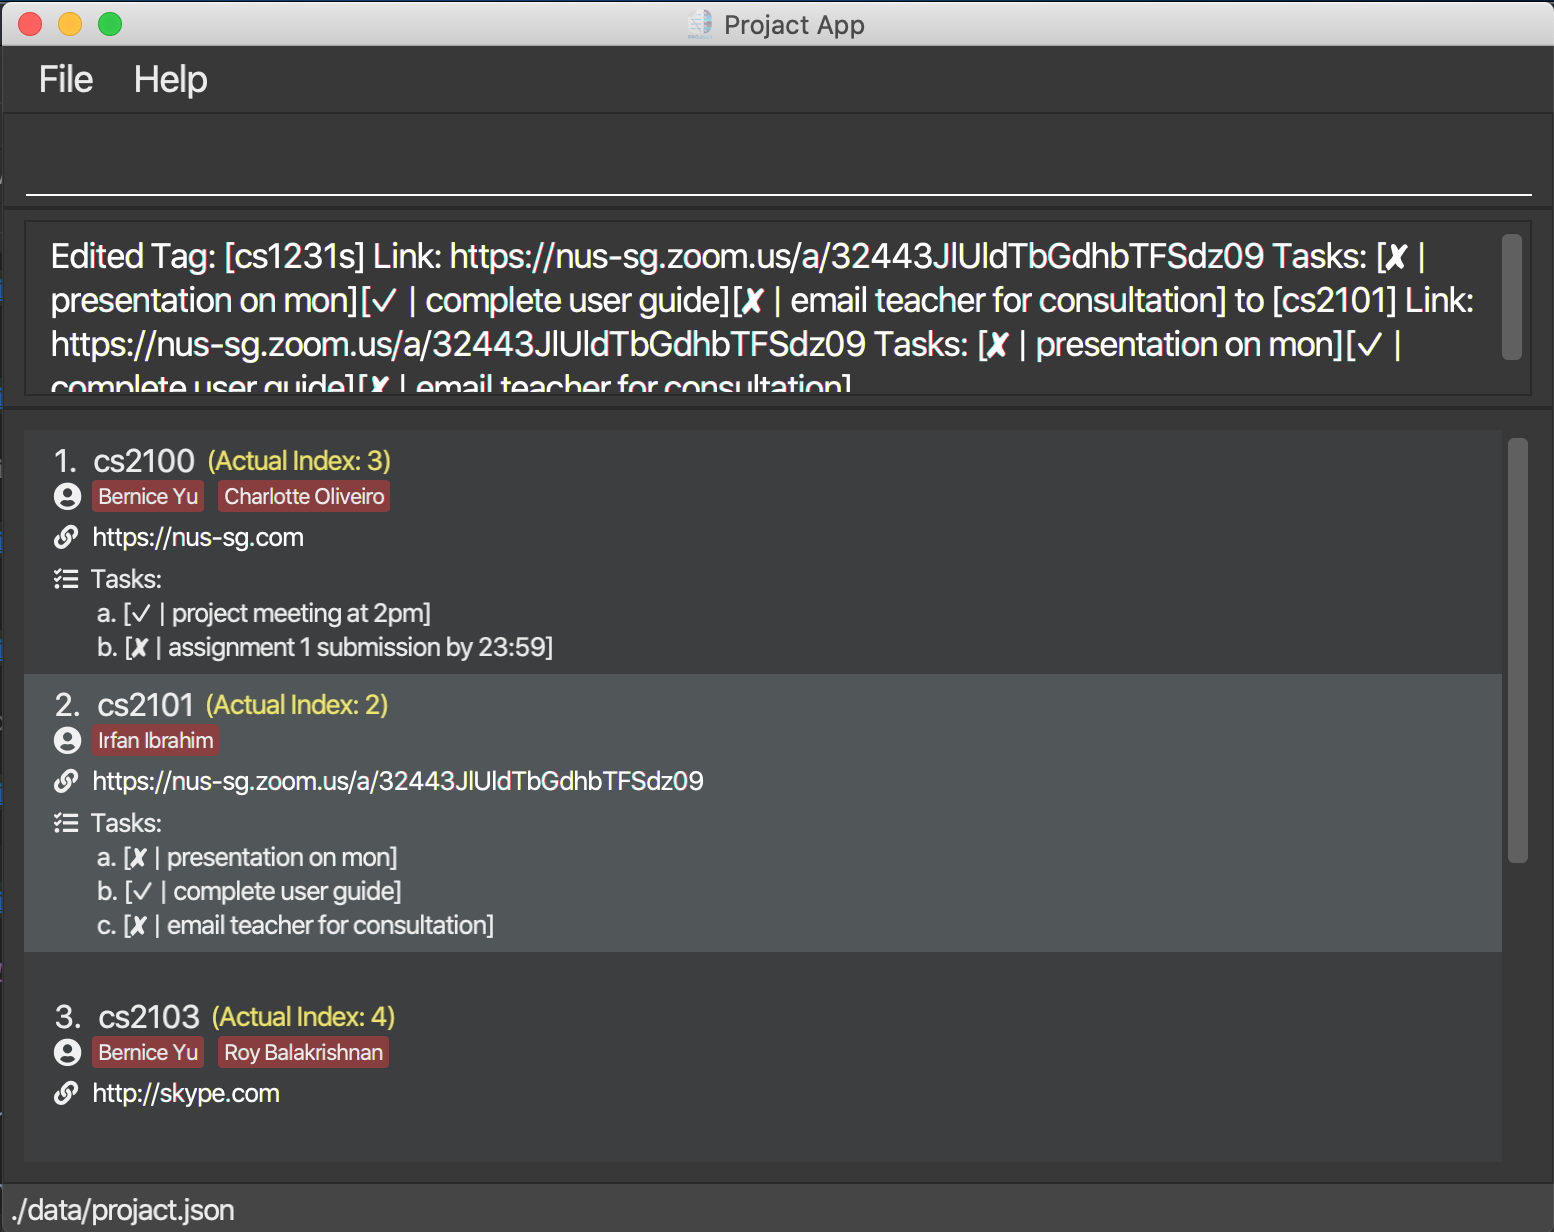
tagfind cs2101followed bytagedit 1 t/cs1231sedits the name of the first tag in the results oftagfindcommand tocs1231s. Step 1: Key intagfind cs2101and hit enter to display all the tags.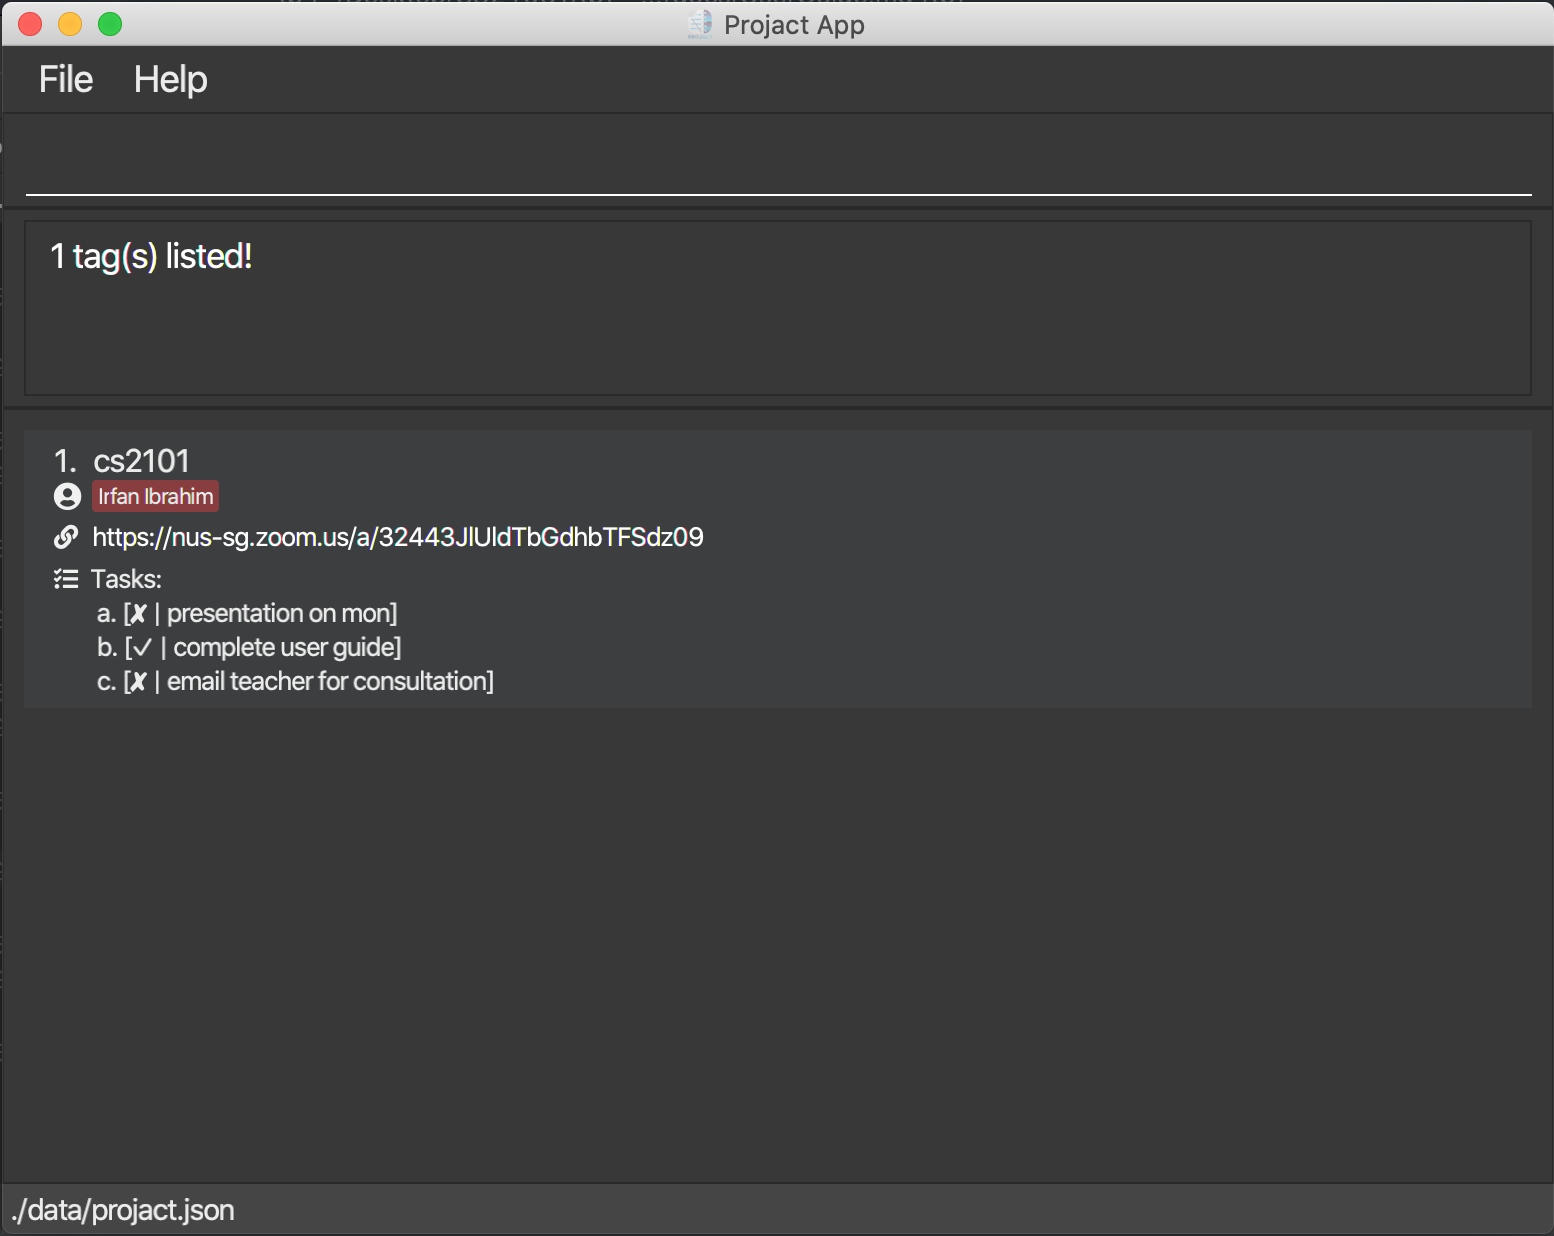
Step 2: Key in tagedit 1 t/cs1231s and hit enter.
-
tagsortfollowed bytagedit 2 t/cs2101edits the name of the second tag in the original tag list tocs2101. Step 1: Key intagsortand hit enter to display all the tags.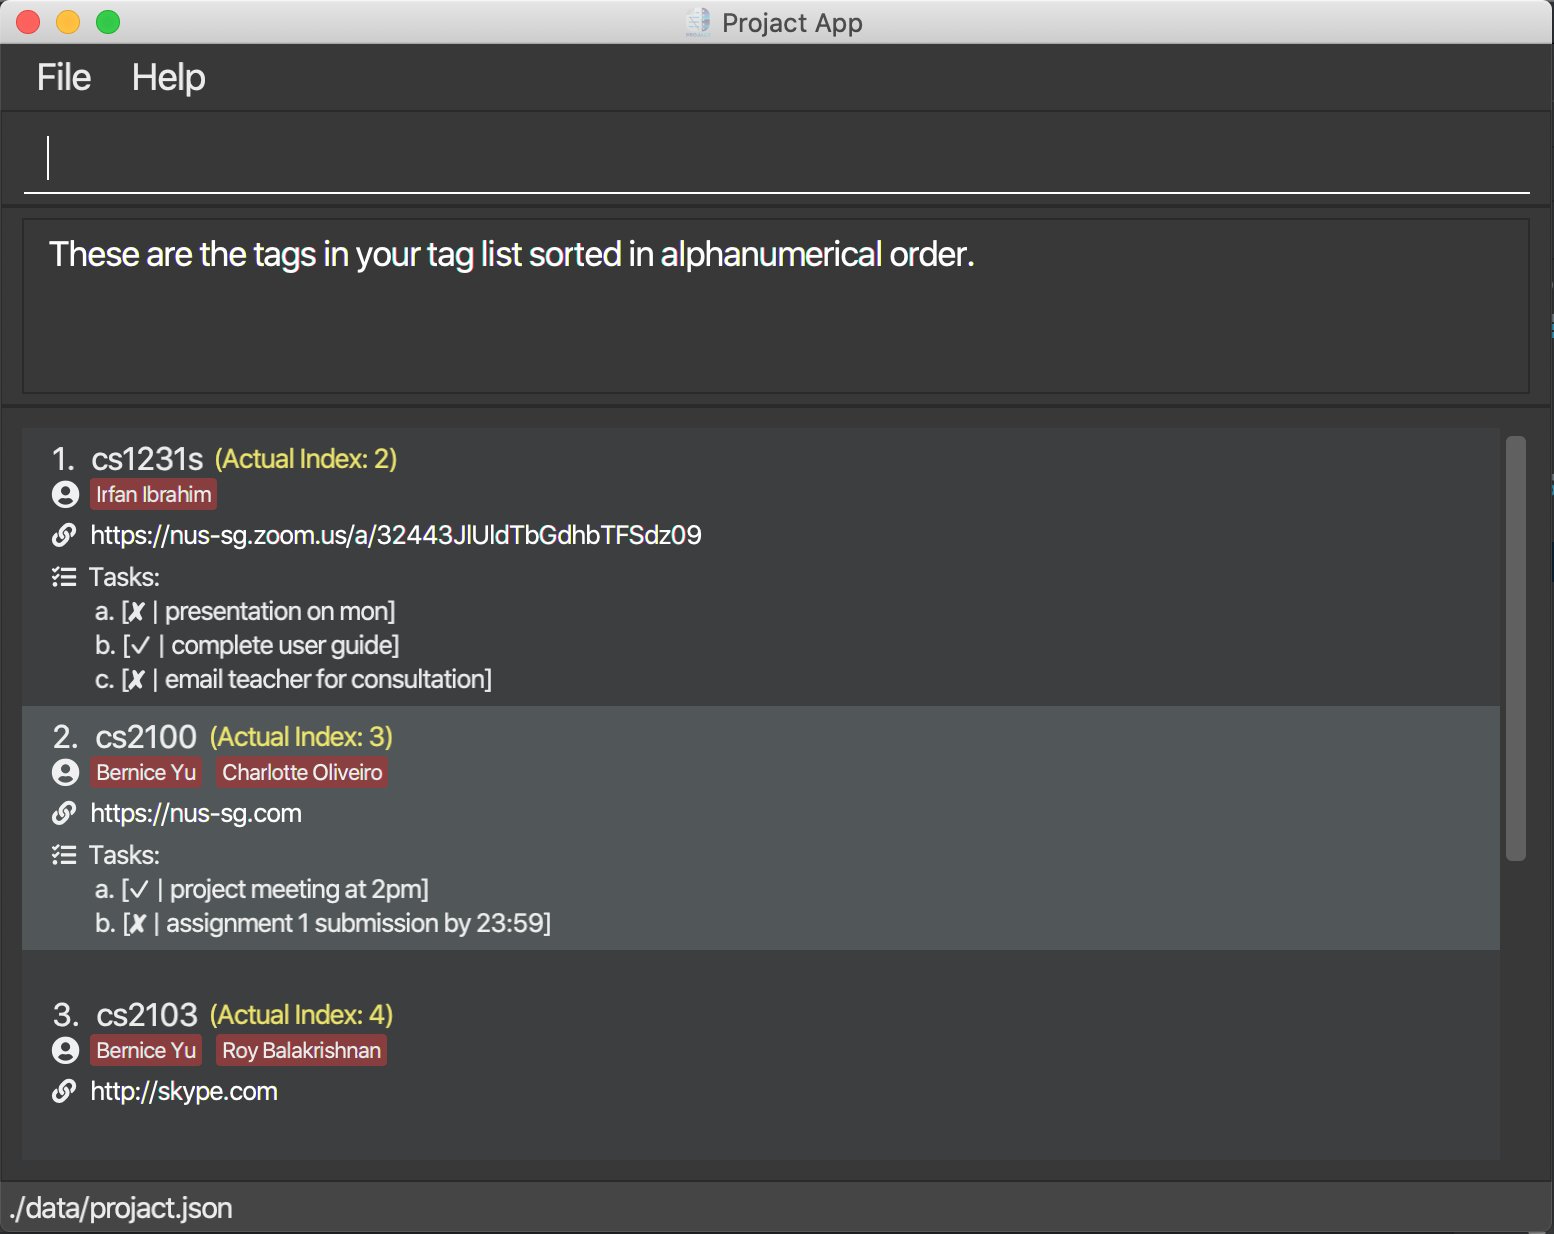
Step 2: Key in tagedit 2 t/cs2101 and hit enter.
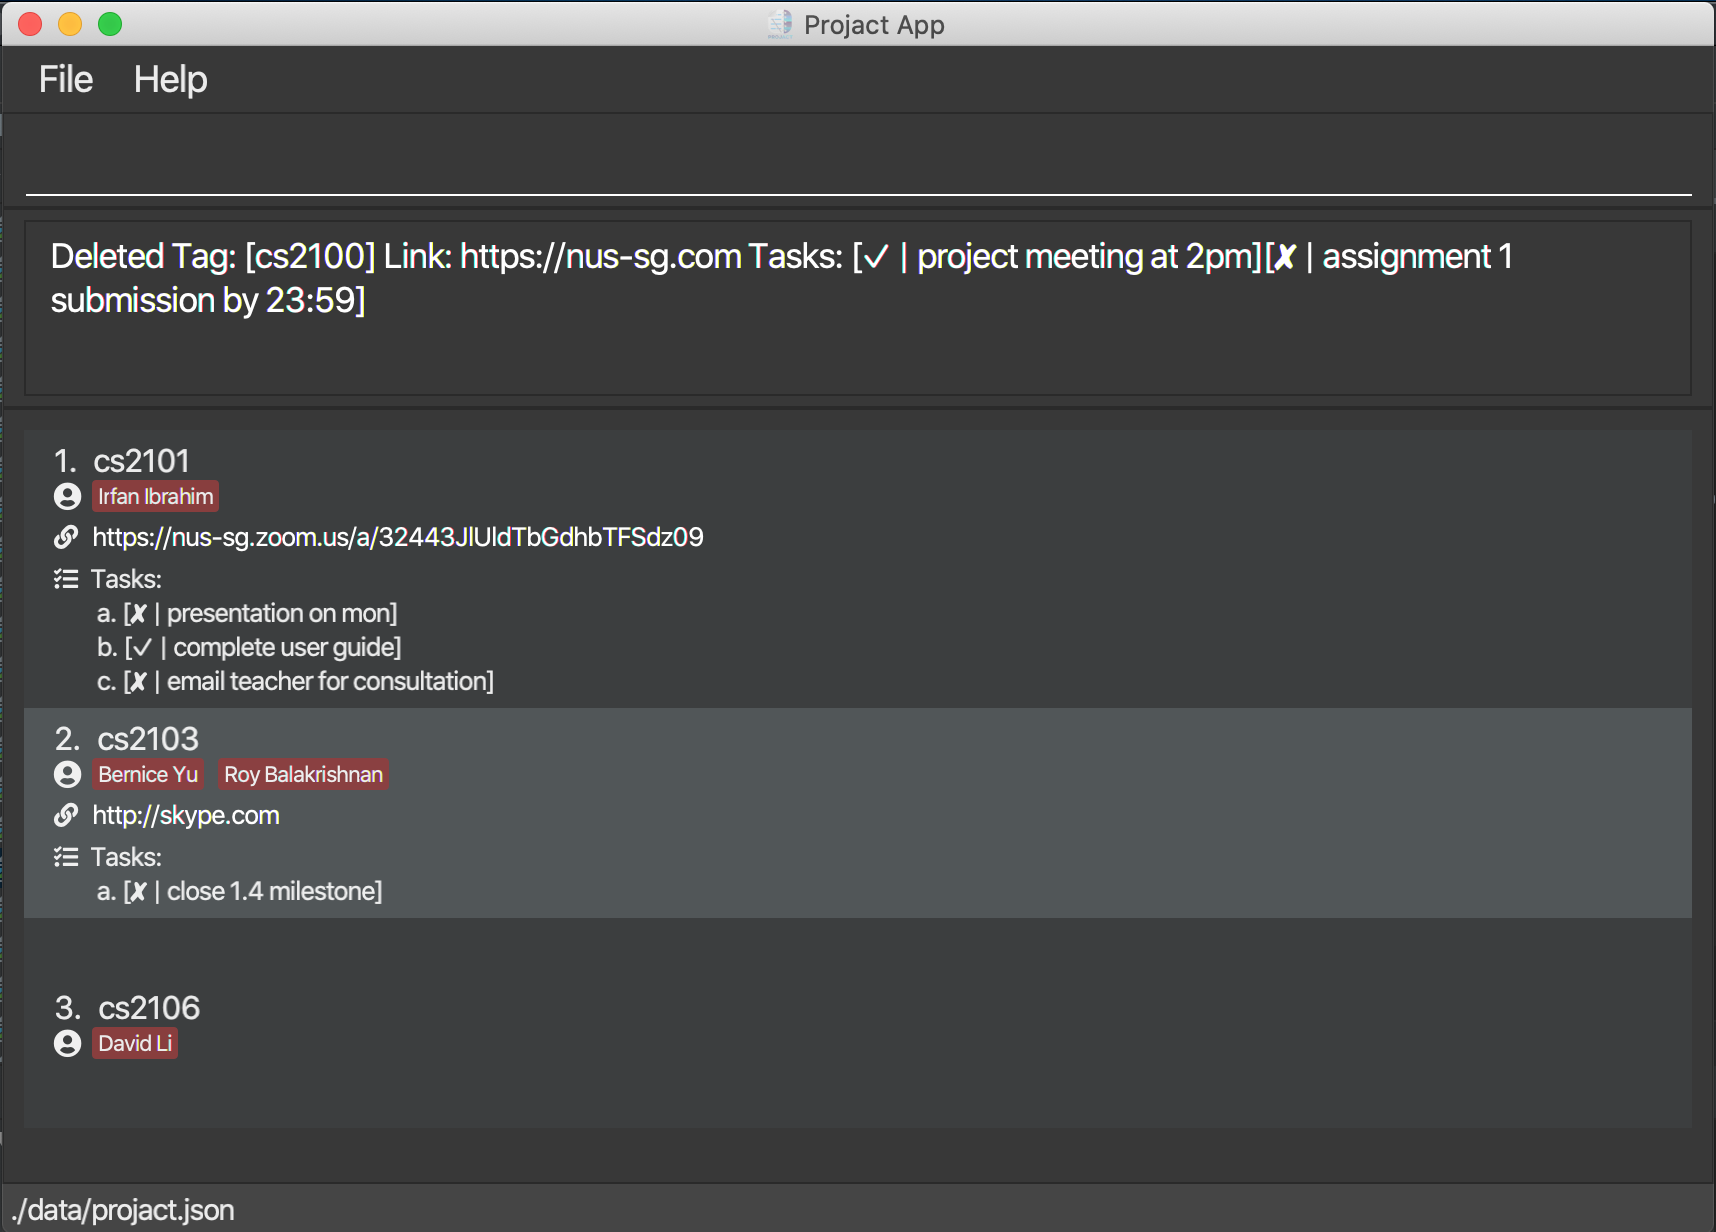
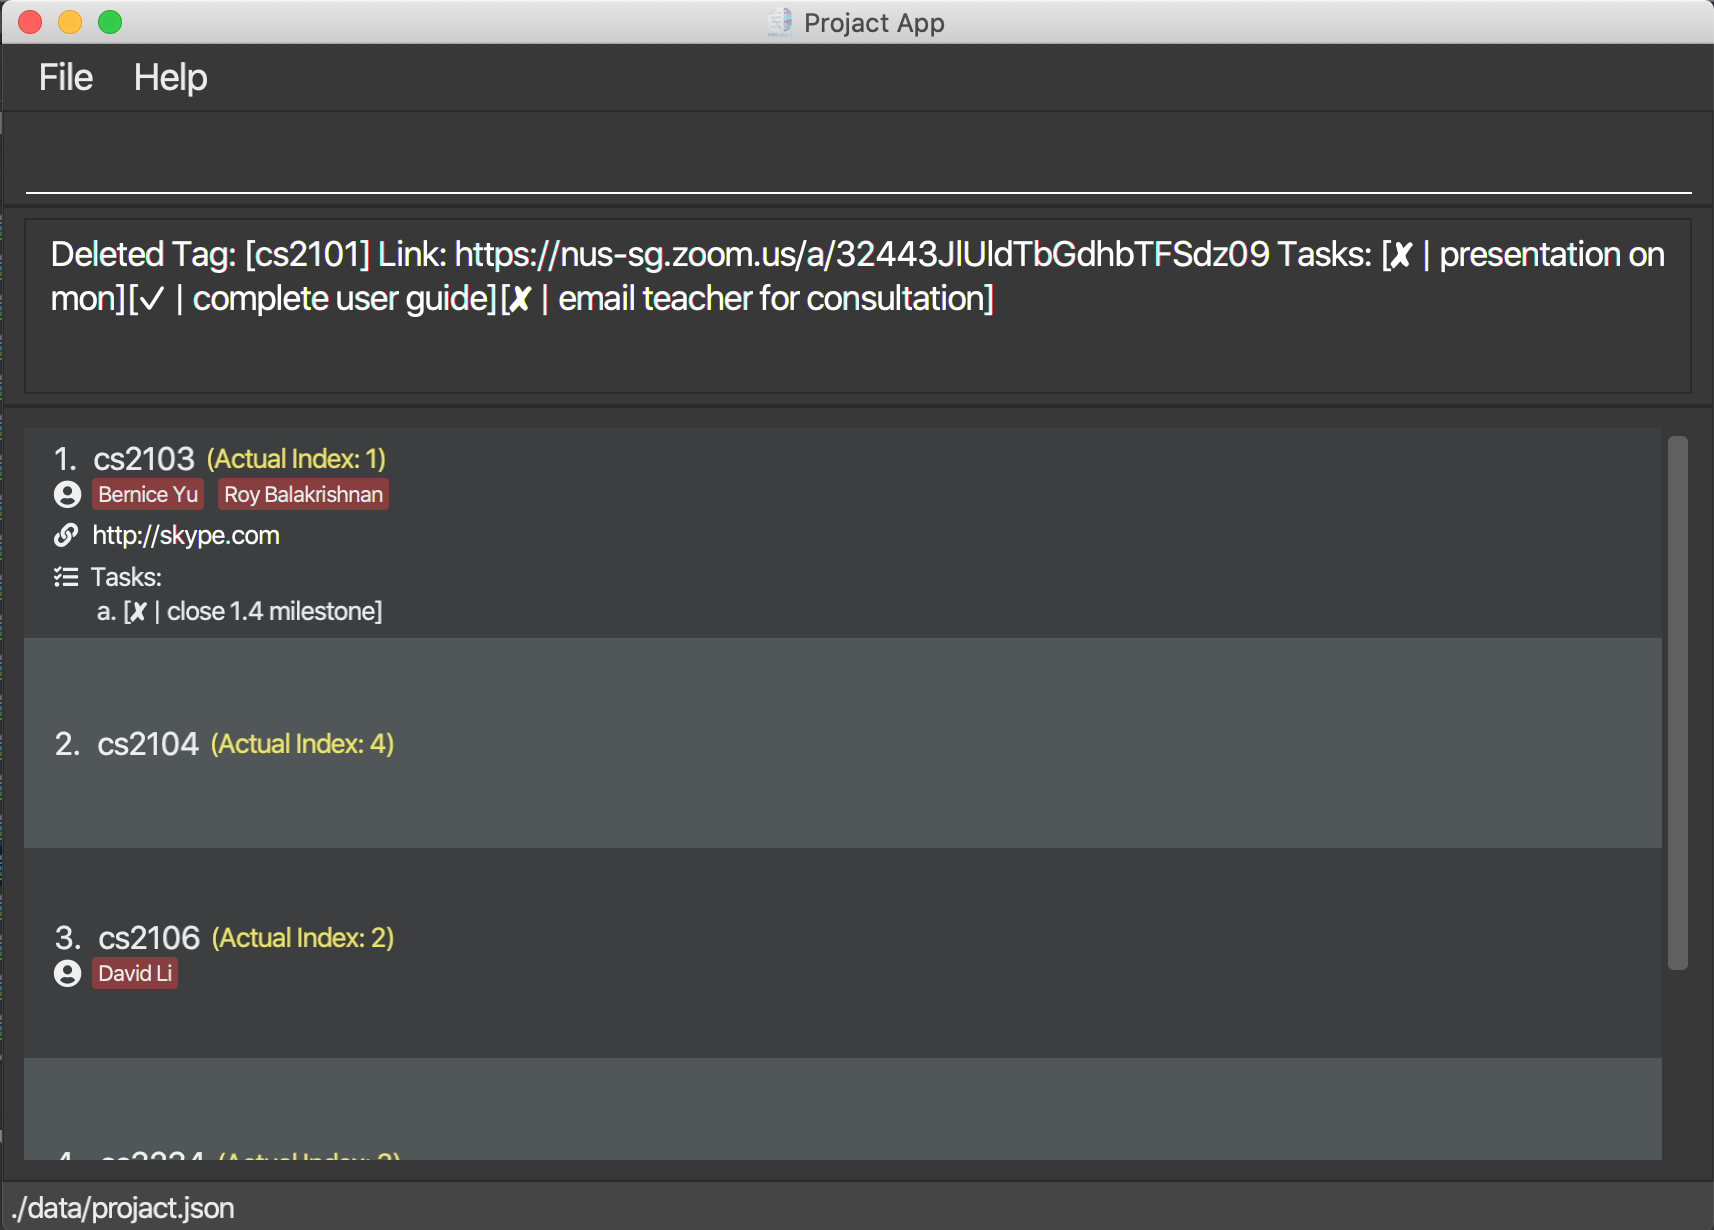
Deleting a tag: tagdelete
Want to get rid of a particular tag? Use the tagdelete command follow by the index INDEX of that tag from the tag list.
![]() Warning:
Warning:
-
The index must be a positive integer 1, 2, 3, …
-
The tag will also be removed from the contact(s) that contain(s) the tag.
-
If you have just used
tagsort, follow theActual Indexas displayed to delete the particular tag you want.
Format: tagdelete INDEX
Example Guide:
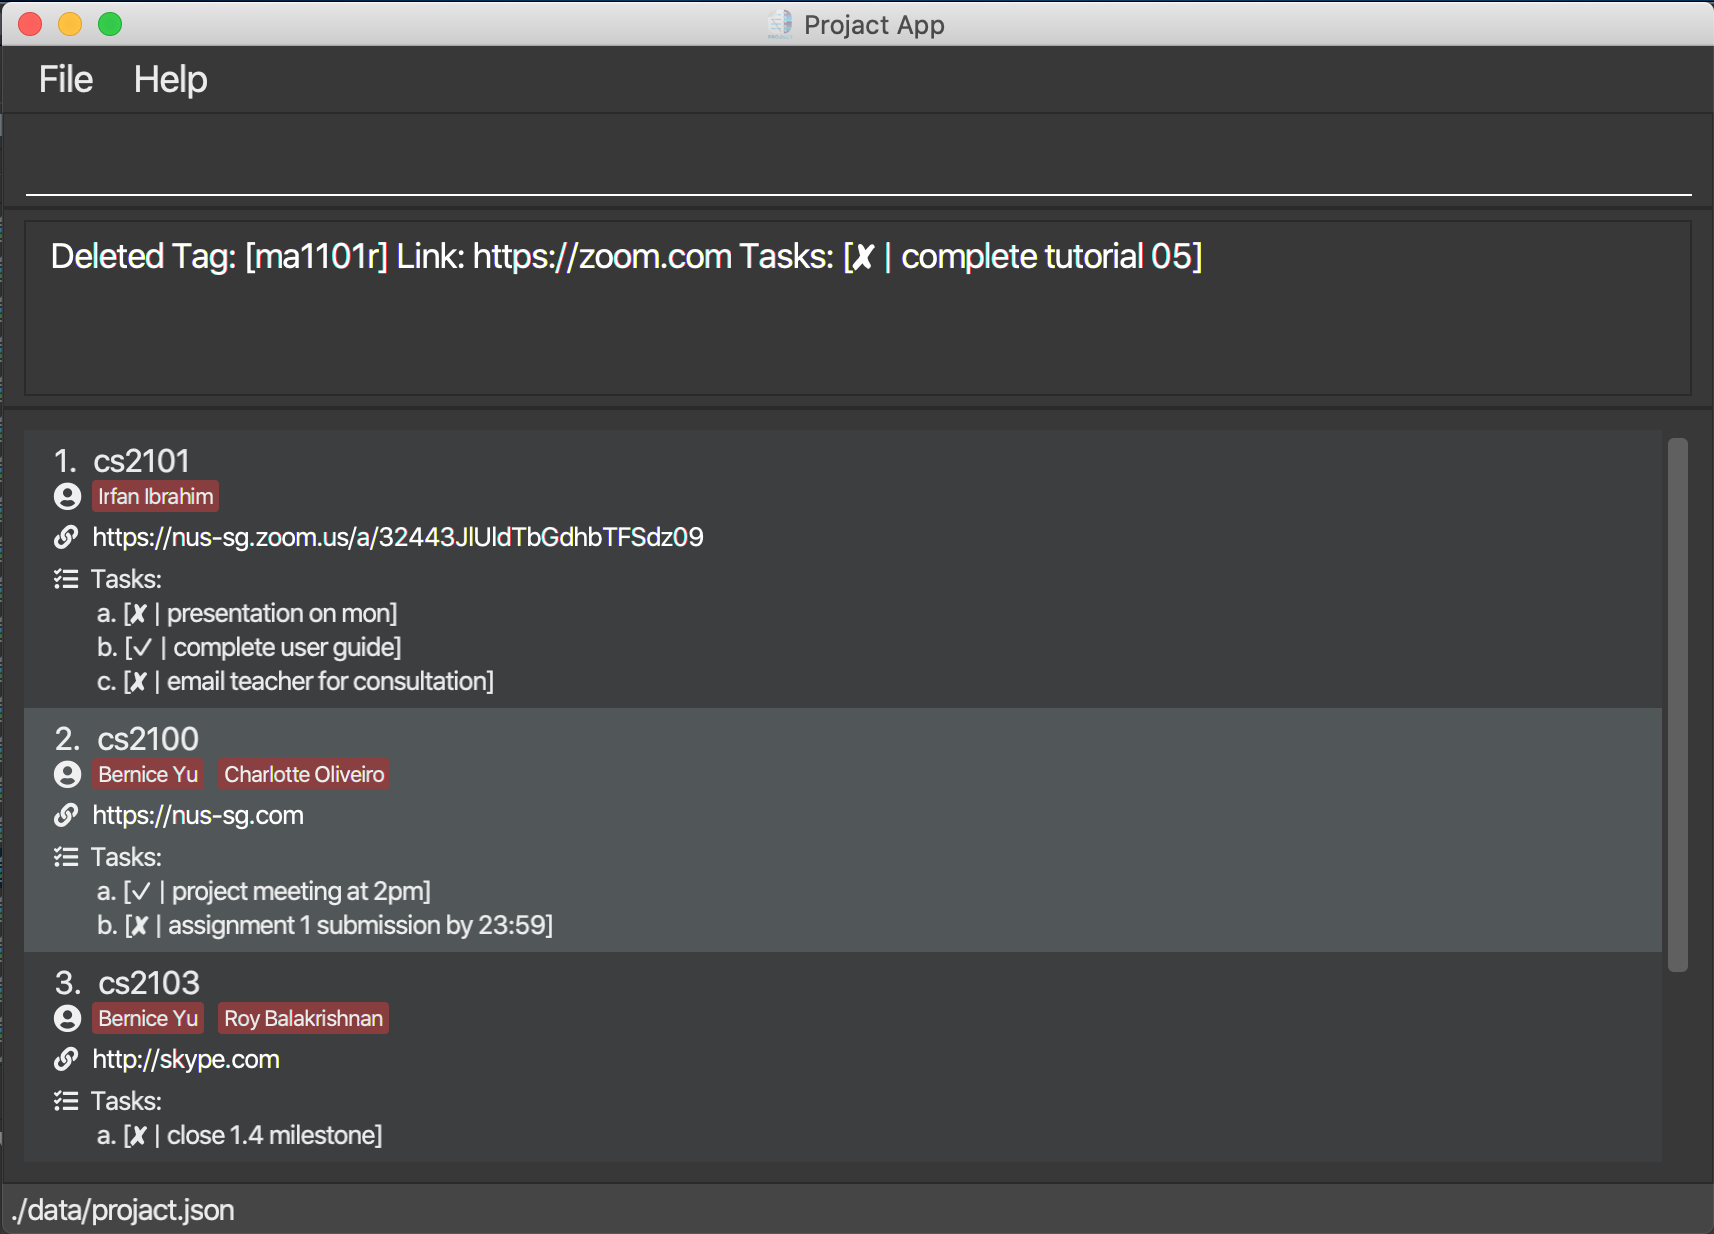
-
taglistfollowed by thetagdelete 1deletes the first tag in the list. Step 1: Key intaglistand hit enter to display all the tags.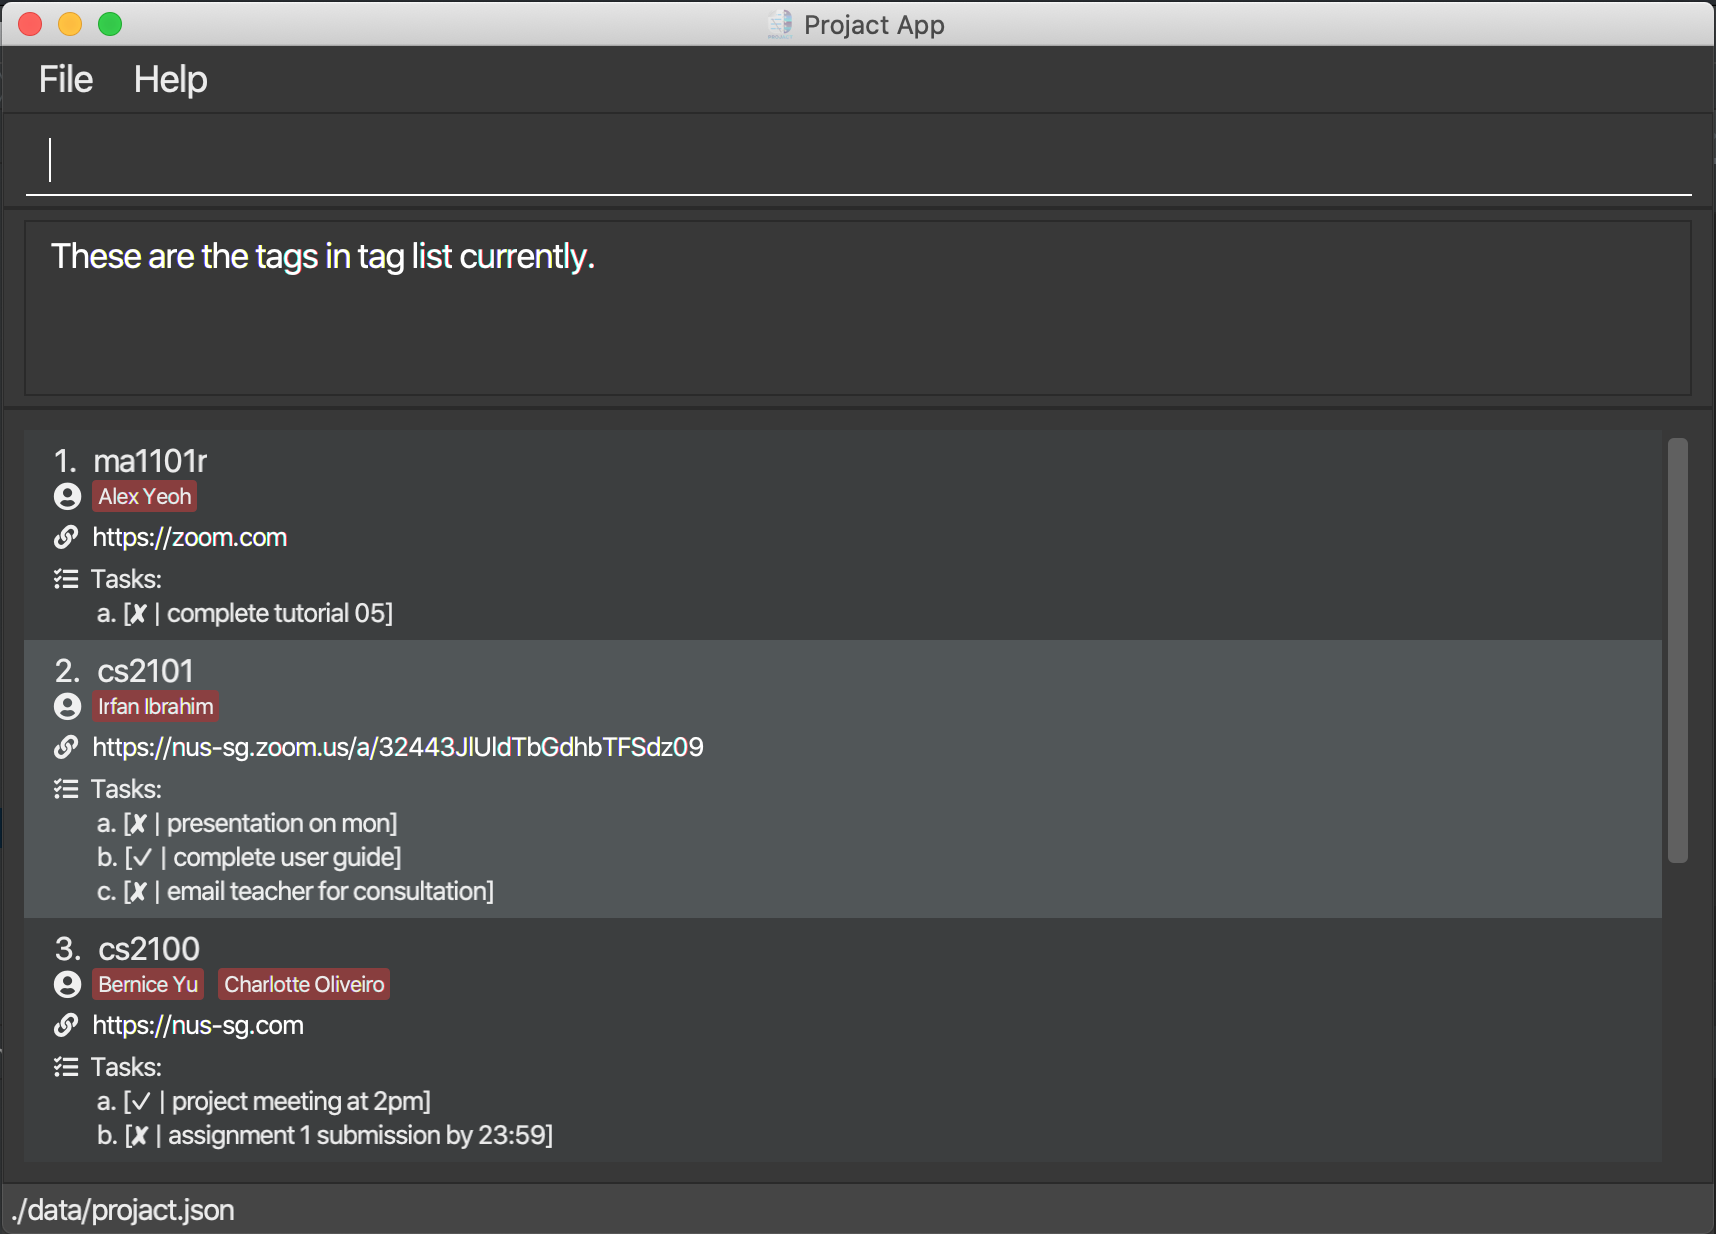
Step 2: Key in tagdelete 1 and hit enter.
-
tagfind cs2100followed bytagdelete 1deletes the first tag in the results oftagfindcommand. Step 1: Key intagfind cs2100and hit enter to display all the tags.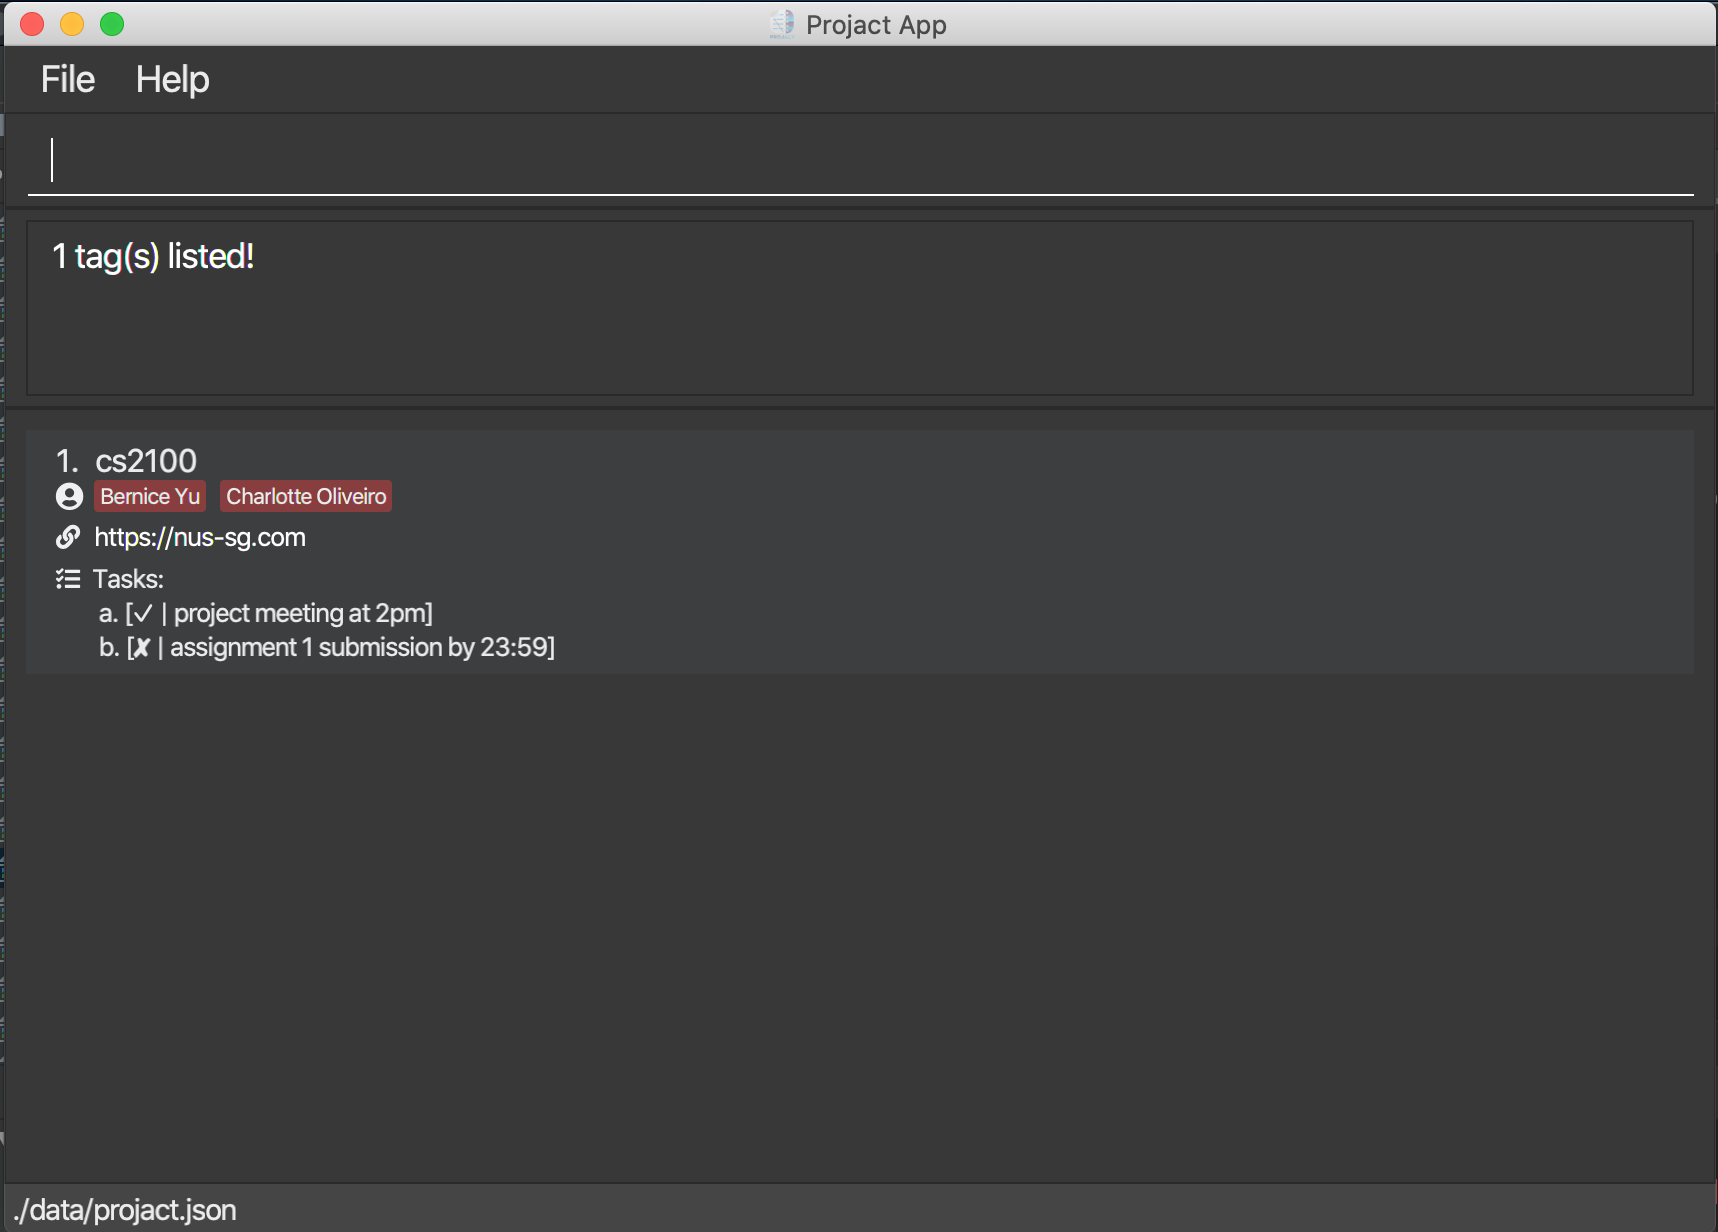
Step 2: Key in tagdelete 1 and hit enter.
-
tagsortfollowed bytagdelete 1deletes first tag in the original tag list. Step 1: Key intagsortand hit enter to display all the tags.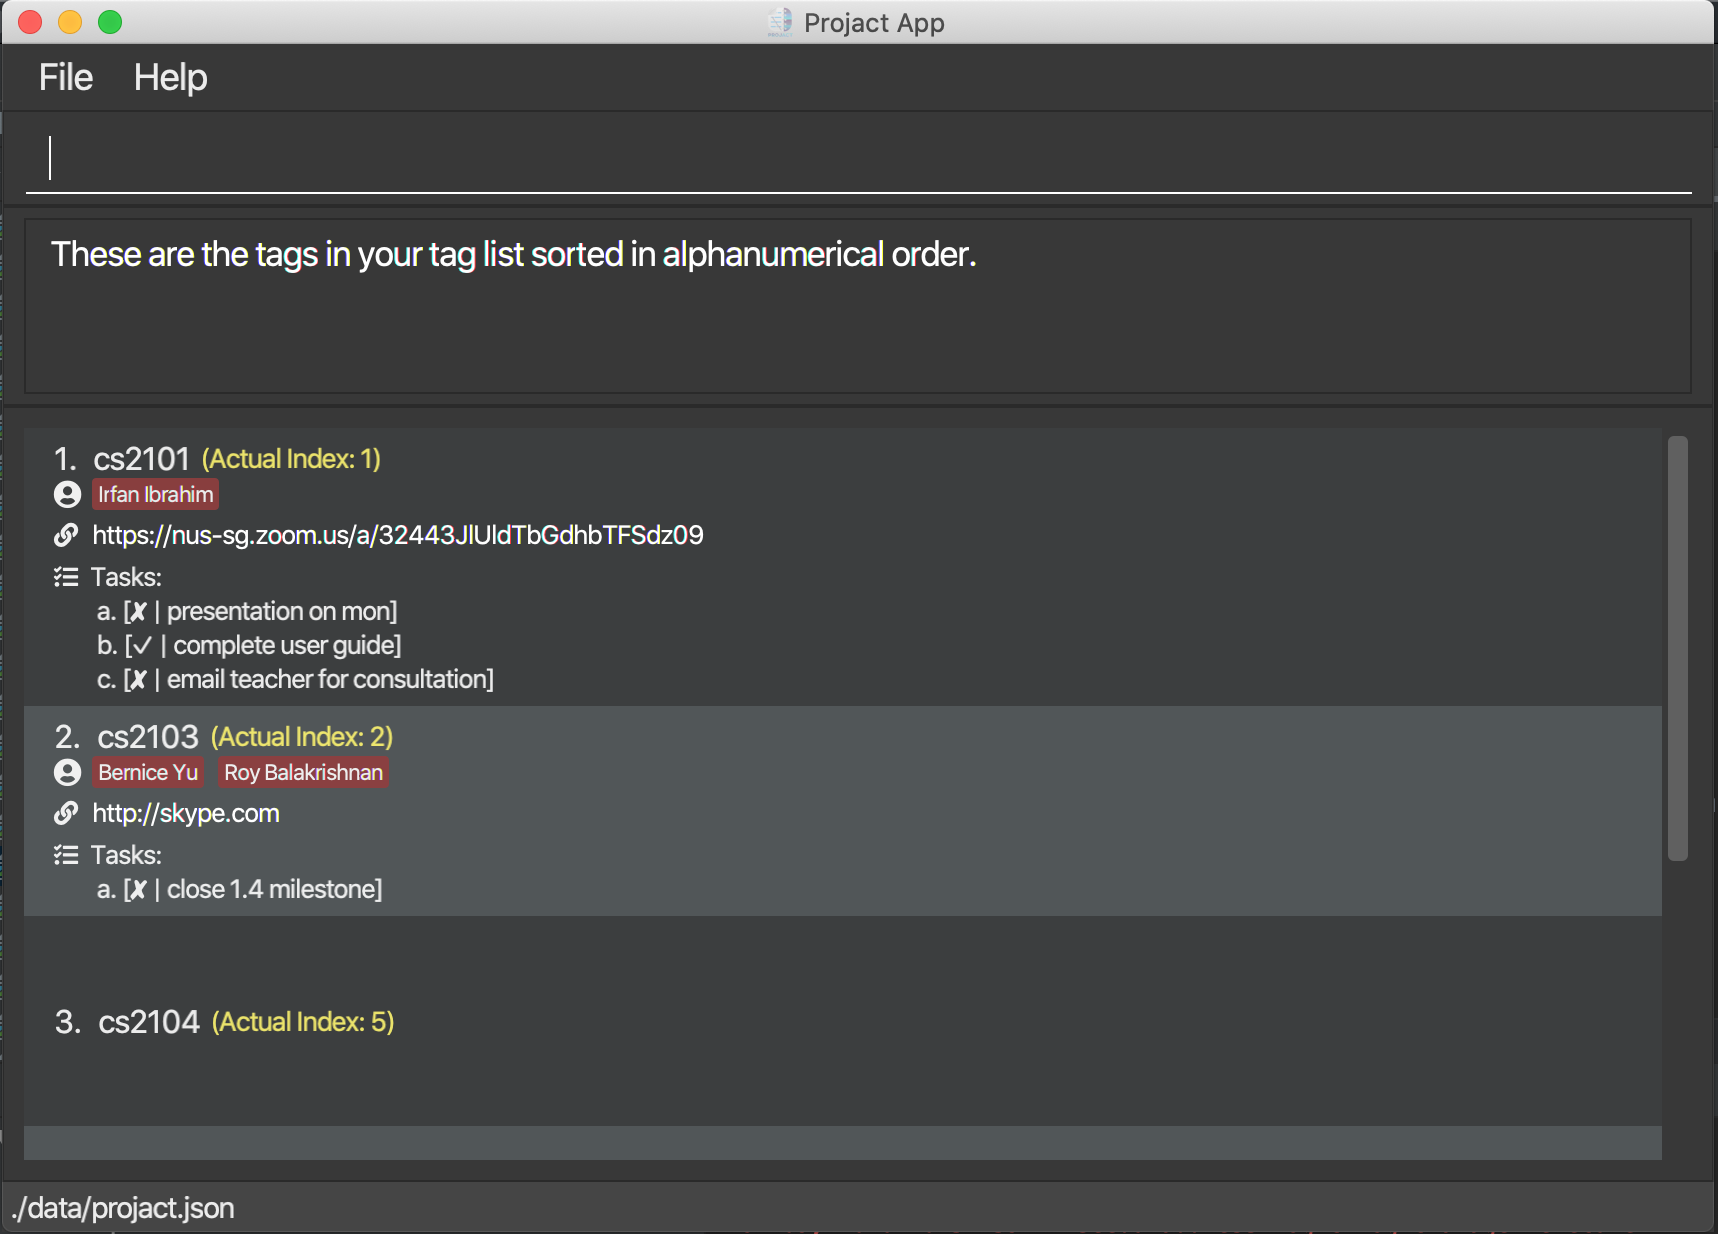
Step 2: Key in tagdelete 1 and hit enter.
Link Features
Adding a link under a tag: linkadd
This command ties a link to a specified tag. It will come in handy if you have group projects or lessons where you have a permanent platform that your group or class meets on (E.g. Zoom, Skype). However, do note that there can only be one link per tag.
Format: linkadd INDEX l/LINK
![]() Warning:
Warning:
-
The index must be a positive integer 1, 2, 3, …
-
Ensure that the link provided starts with either “https://” or “http://” and has top level domains such as “.com” and “.org”.
![]() Tip:
You can click on the link to be redirected to your browser or application!
Tip:
You can click on the link to be redirected to your browser or application!
Example:
-
linkadd 1 l/http://nus-sg.comedits the first tag in the list to have the link “http://nus-sg.com”.
Step-By-Step Guide:
Step 1: First key in taglist and hit enter to display all the tags.
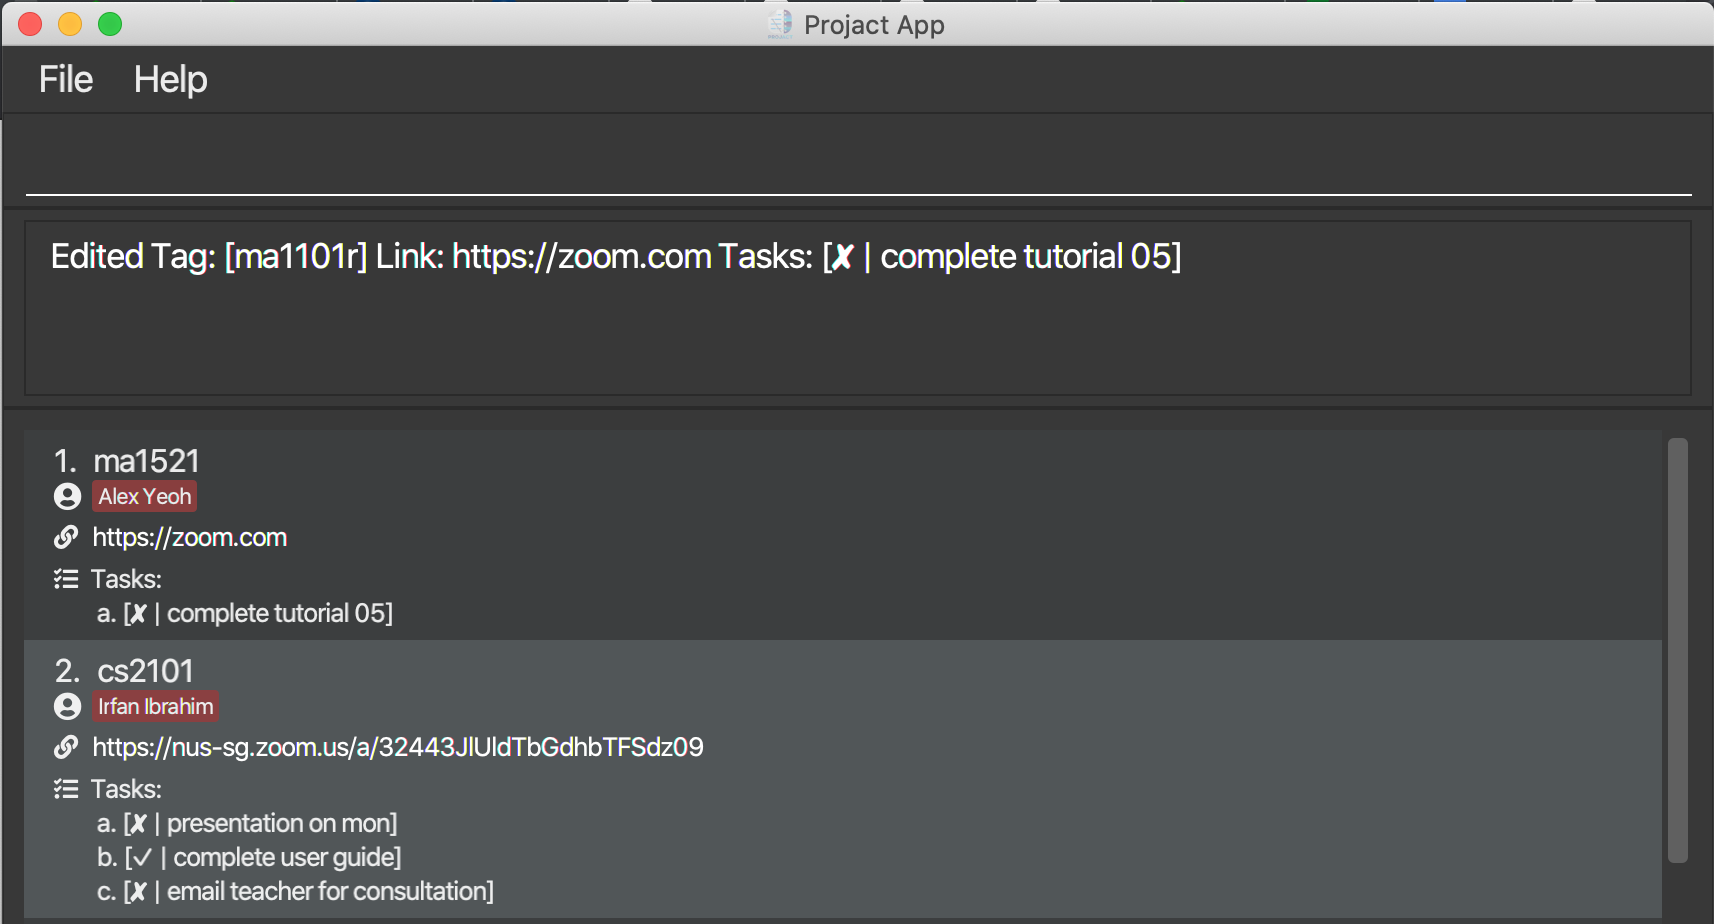
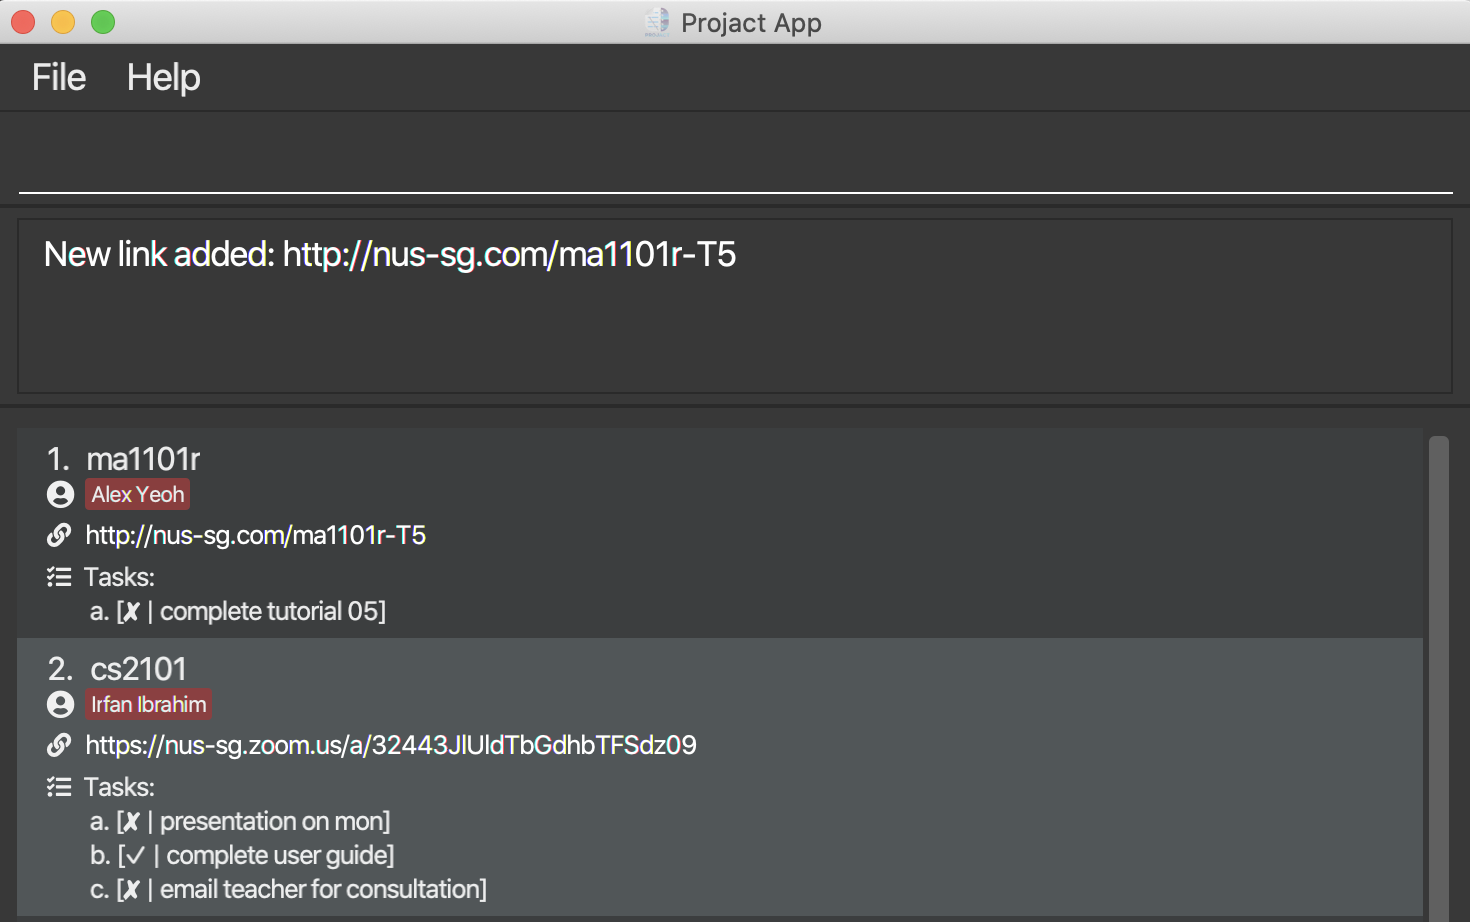
Step 2: For example, if you want to add your Zoom tutorial meeting link to the “ma1101r” tag, key in linkadd 1 l/http://nus-sg.com/ma1101r-T5 and hit enter.

Step 3: You should see the link being added to the “ma1101r” tag like this.
Deleting the link under the tag: linkdelete
Want to get rid of the link under a particular tag? Use the linkdelete command followed by the index INDEX of that tag from the tag list.
Format: linkdelete INDEX
![]() Warning:
Warning:
- The index must be a positive integer 1, 2, 3, …
Example:
-
linkdelete 1deletes the link from the first tag in the list.
Step-By-Step Guide:
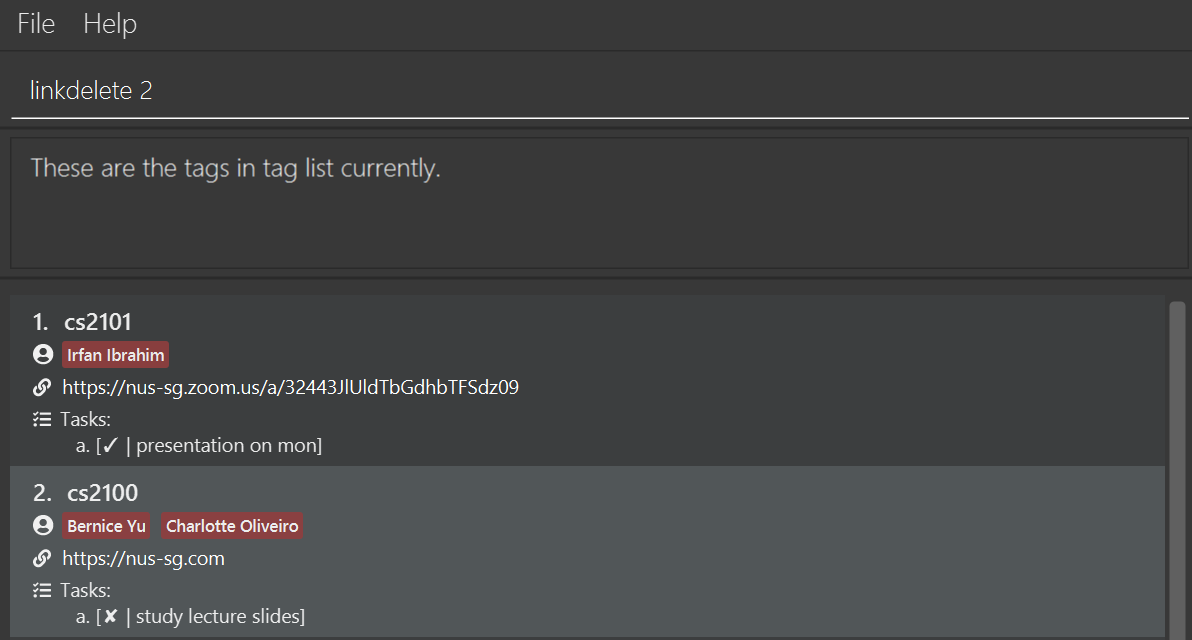
Step 1: First key in taglist and hit enter to display all the tags. For example, if you want to remove the link from
the “classmates” tag, key in linkdelete 2 and hit enter.
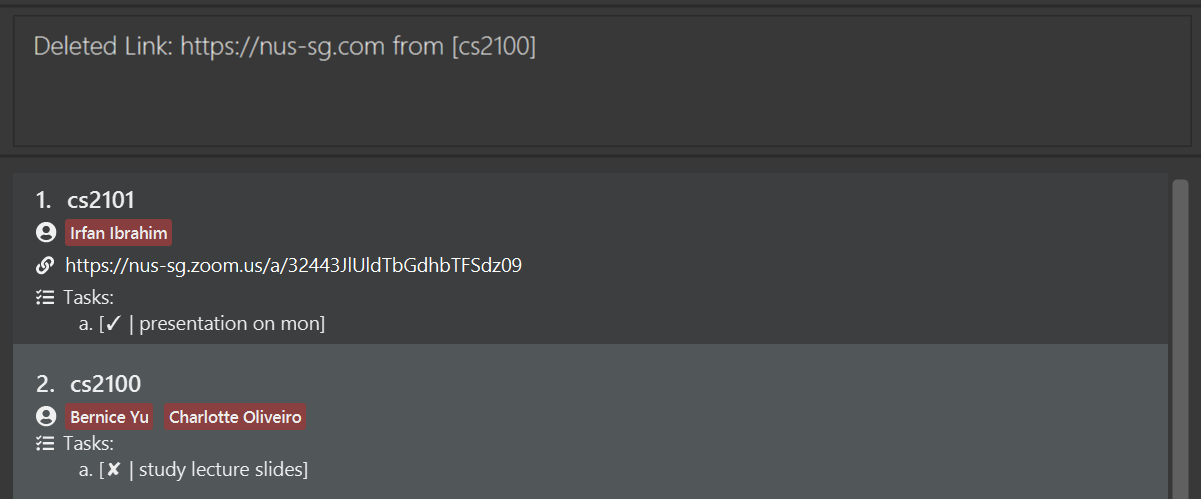
Step 2: You should see the link being removed from the “cs2100” tag like this.
Task Features
Adding a task: taskadd
Is there a specific task you want to add to a tag? Simply use the taskadd command followed by the index of that tag, and the name of the task!
Format: taskadd INDEX task/TASK_NAME
- Adds a task to the tag with the
INDEXfrom the current view of the tag list after doingtaglist.
![]() Warning:
Warning:
-
The index must be a positive integer 1, 2, 3, …
-
Only a maximum of 26 tasks can be added to each tag, due to the alphabet being used as an index. i.e. Unable to add new tasks after the task with index
z. -
Task will not be added if specified tag with
INDEXalready has a task with the same task name.
Example:
-
taskadd 2 task/peer reviewadds a task to the tag with the index 2 in the current tag list.
Step-By-Step Guide:
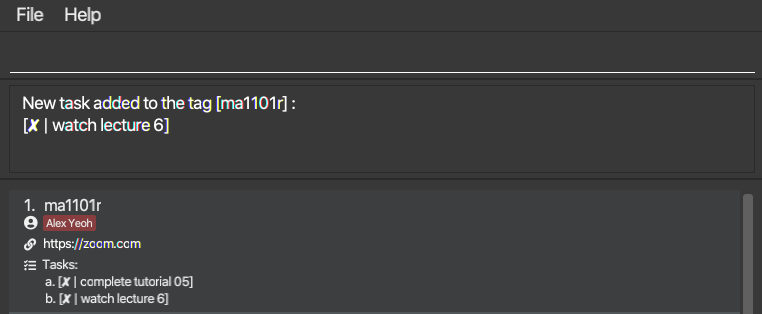
Step 1: Start on the taglist view.

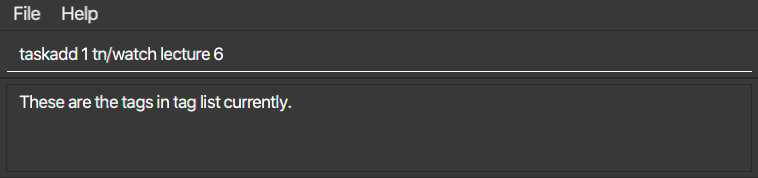
Step 2: Enter the taskadd command, the index of the tag you want to add a task to 1, and the new task name tn/watch lecture 6.
Step 3: Press enter, and the task is now added after the last displayed task complete tutorial 05.
Marking a task under a tag as done: taskdone
After adding a task to your targeted tag, you must have seen the cross beside the task description. So how do you mark the
task as done once you have completed the task? Use taskdone followed by the index INDEX of the tag and
the alphabetical index ALPHAINDEX to do the magic!
Format: taskdone INDEX ALPHAINDEX
Example:
-
taskdone 1 amarks the task with the alphabetical index a from the first tag in the list as completed.
Step-By-Step Guide:
Step 1: First key in taglist and hit enter to display all the tags.
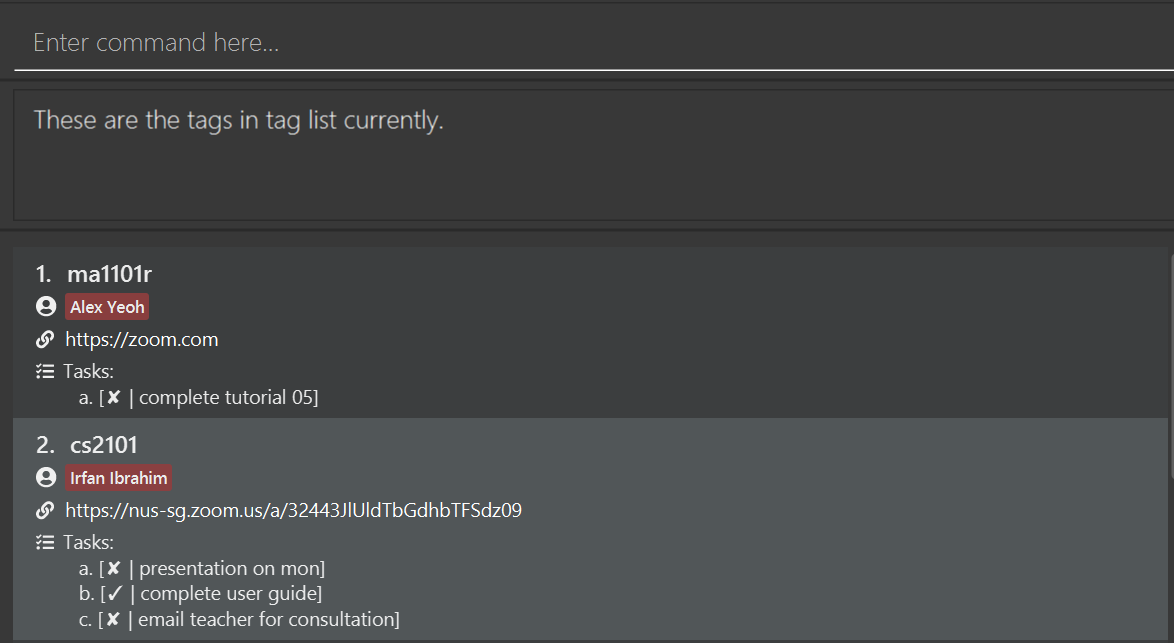
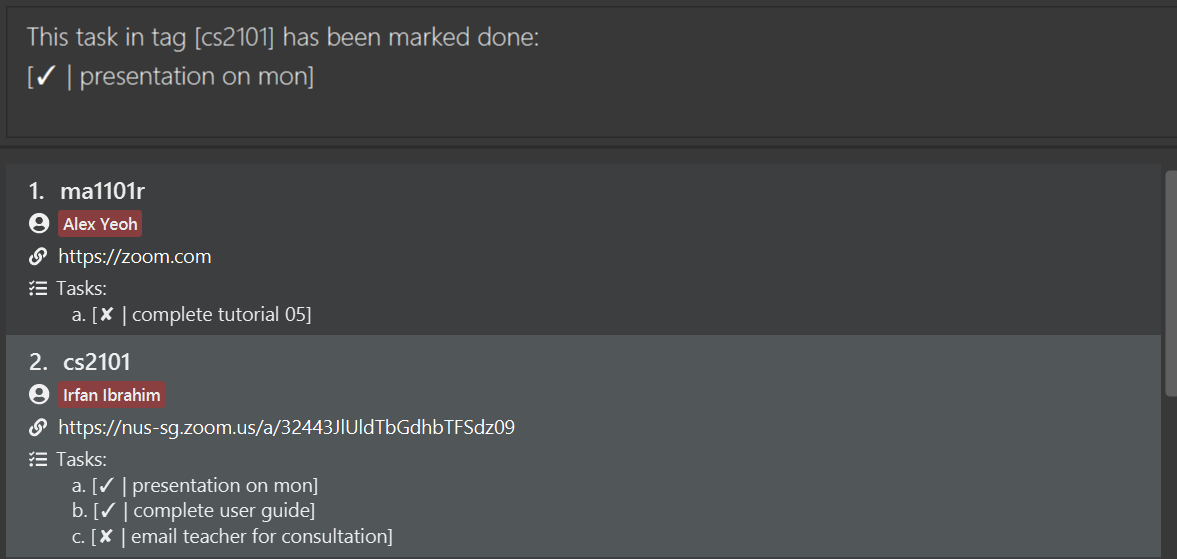
Step 2: For example, if you want to mark the second task under the tag “cs2101” as done. Key in “taskdone 2 a” and hit enter.

Step 3: You should see the task “complete user guide” have a tick beside it.
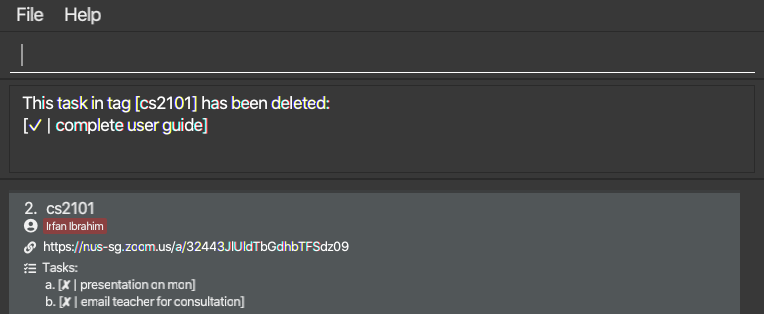
Deleting a task: taskdelete
Are the tasks added no longer needed? Or perhaps you’ve accidentally added the wrong task to the wrong tag? Worry not! Use the taskdelete command followed by the index of that tag, and the alphabetical index of the task!
Format: taskdelete INDEX ALPHAINDEX
- Deletes a task to the tag with the
INDEXfrom the current view of the tag list (either tagsort or taglist).
Example:
-
taskdelete 1 bdeletes the task with the alphabetical index b from the tag with the index 1 in the current tag list.
Step-By-Step Guide:
Step 1: Start on the taglist view.
Step 2: Enter the taskdelete command, the index of the tag you want to delete a task from 2, and the task name you want to delete b.
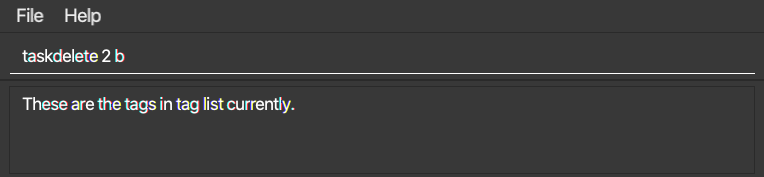
Step 3: Press enter, and the task is now deleted.
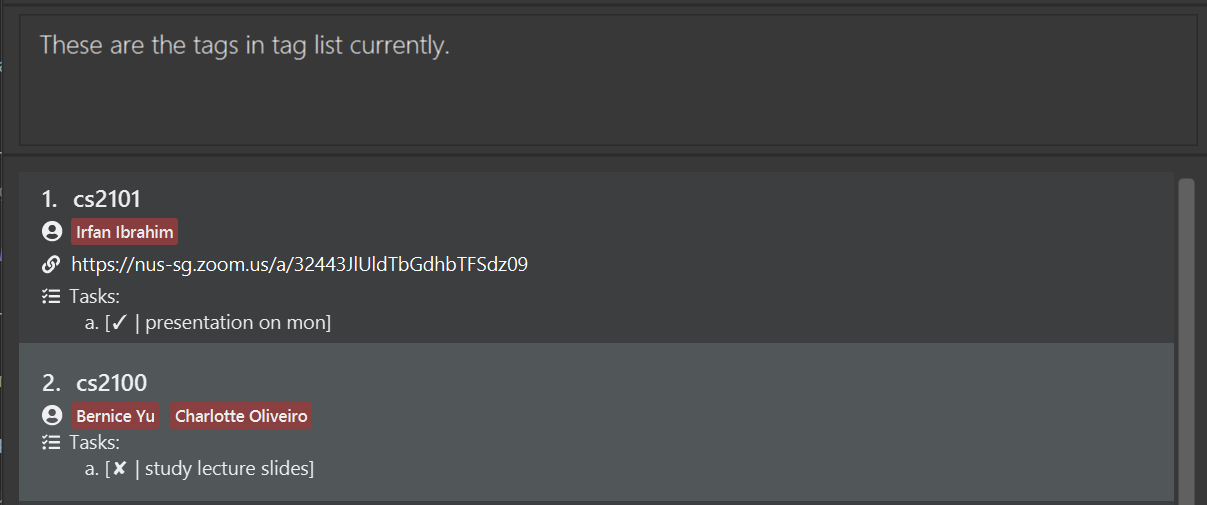
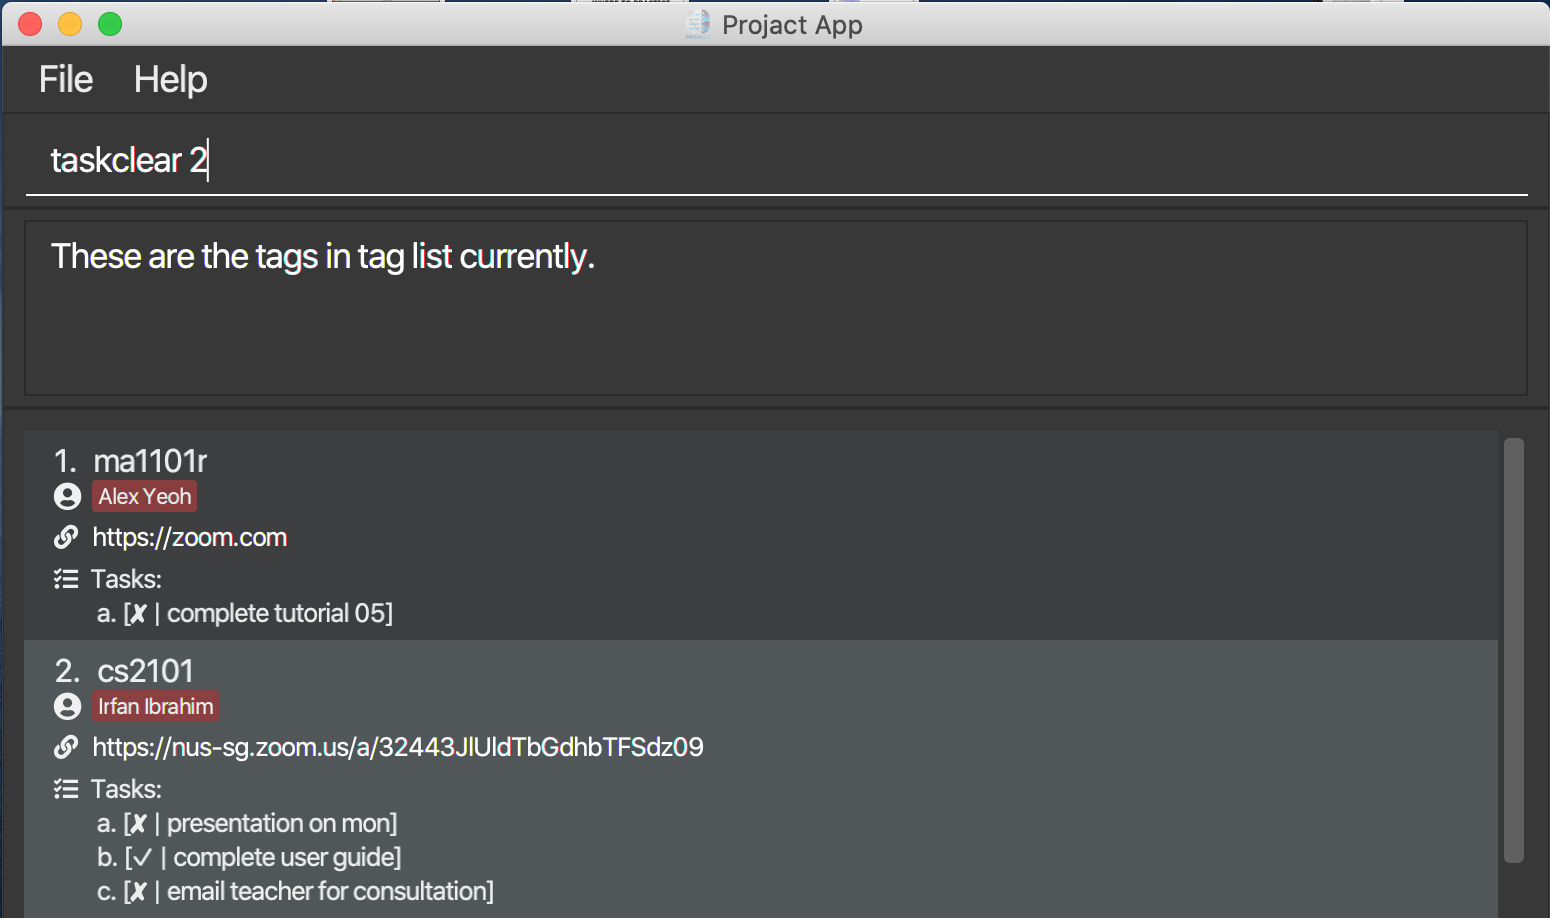
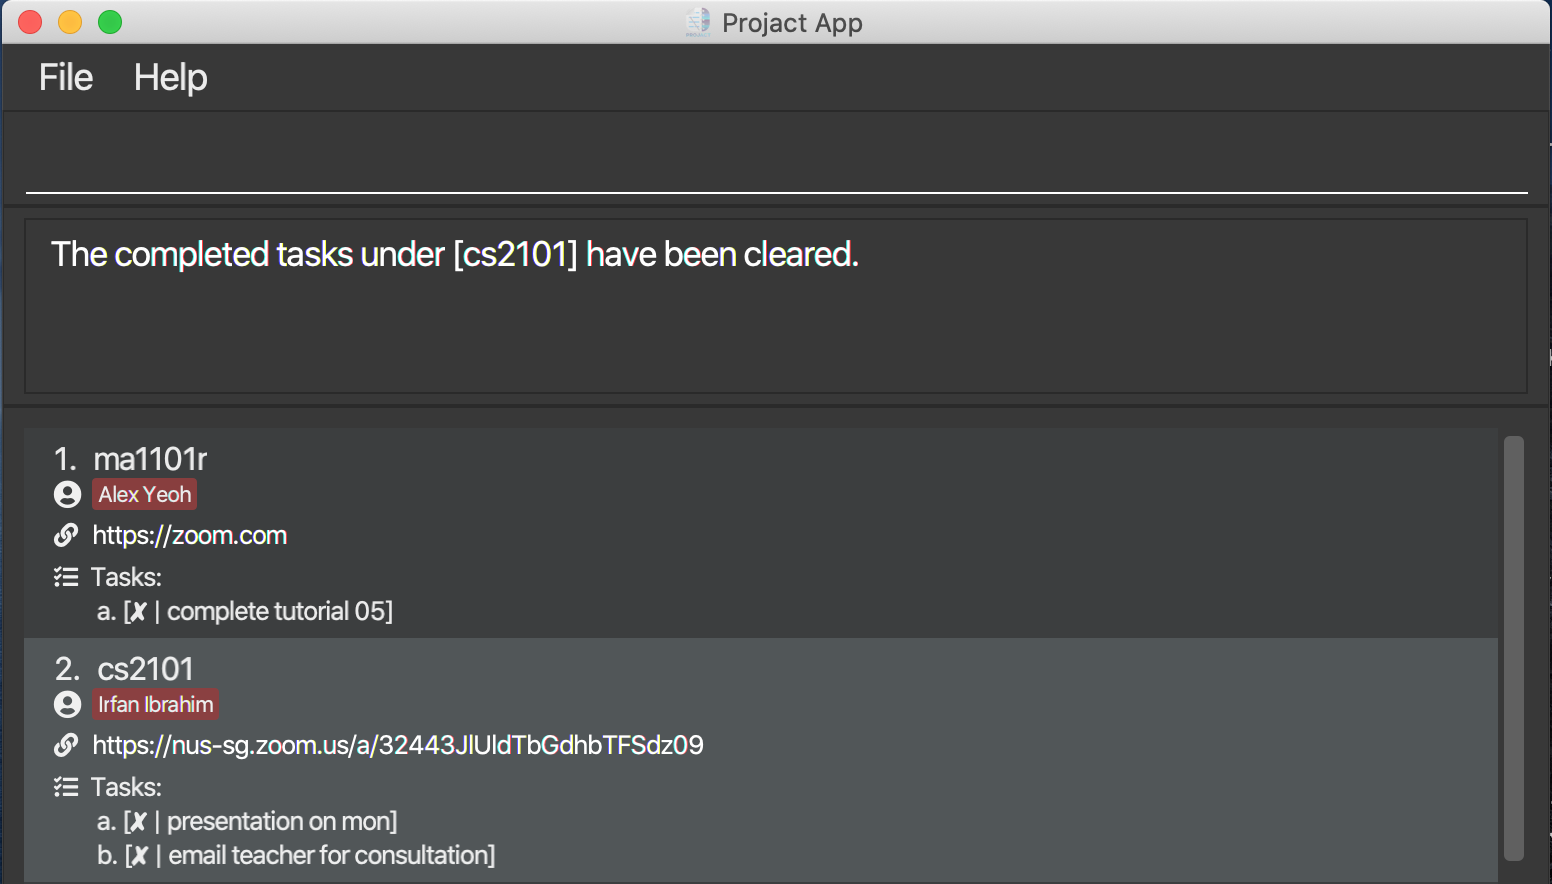
Clearing all completed tasks: taskclear
Do you want the satisfaction of striking off all the tasks you’ve completed? Well, Projact can’t do that but it sure can offer you a way to delete all of your completed tasks!
Format: taskclear INDEX
Example:
-
taskclear 1clears all completed tasks from the tag with the index 1 in the current tag list.
Step-By-Step Guide:
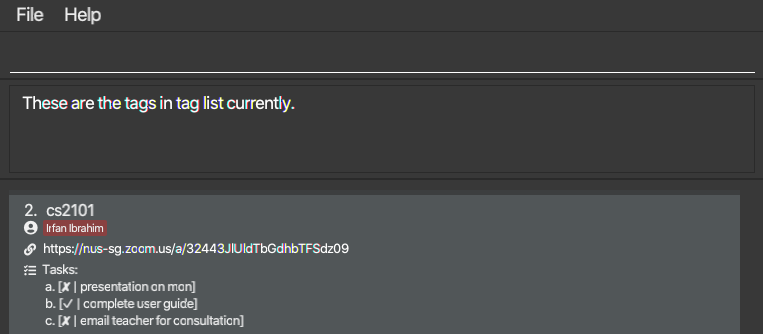
Step 1: For example, if you want to clear all the completed tasks from the tag “cs2101”, Key in taskclear 2.
Step 2: Hit enter and you should see that all the completed tasks will be removed.
Command summary
General commands
| Action | Format, Examples |
|---|---|
| Help | help |
| Clear | clear |
| Exit | exit |
Contact commands
| Action | Format, Examples |
|---|---|
| Add |
add n/NAME p/PHONE_NUMBER e/EMAIL ta/TELEGRAM_ADDRESS [t/TAG]… e.g., add n/Betsy Crowe e/bcrow@example.com ta/betsycr0w p/1234567 t/cs2101 t/ma1101r
|
| Find |
find KEYWORD [MORE_KEYWORDS]e.g., find James Jake
|
| List | list |
| Sort | sort |
| Edit |
edit INDEX [n/NAME] [p/PHONE_NUMBER] [e/EMAIL] [ta/TELEGRAM_ADDRESS] [t/TAG]…e.g., edit 2 n/James Lee e/jameslee@example.com
|
| Delete |
delete INDEXe.g., delete 3
|
Tag commands
| Action | Format, Examples |
|---|---|
| Tag Add |
tagadd t/TAGe.g., tagadd t/CS2103T
|
| Tag List | taglist |
| Tag Find |
tagfind KEYWORD [MORE_KEYWORDS]e.g., tagfind cs2100 cs2101
|
| Tag Sort | tagsort |
| Tag Edit |
tagedit INDEX t/TAG_NAME e.g., tagedit 1 t/CS2101
|
| Tag Delete |
tagdelete INDEX e.g., tagdelete 1
|
Link commands
| Action | Format, Examples |
|---|---|
| Link Add |
linkadd INDEX l/LINK e.g, linkadd 2 l/https://skype.com/cs2103proj/
|
| Link Delete |
linkdelete INDEXe.g., linkdelete 1
|
Task commands
| Action | Format, Examples |
|---|---|
| Task Add |
taskadd INDEX task/TASK_NAMEe.g., taskadd 1 task/peer review
|
| Task Delete |
taskdelete INDEX ALPHAINDEXe.g., taskdelete 1 b
|
| Task Done |
taskdone INDEX ALPHAINDEXe.g., taskdone 1 c
|
| Task Clear |
taskclear INDEX e.g., taskclear 1
|
FAQ
Q: How do I transfer my data to another Computer?
A: Copy all the current files generated by the application, together with the projact.jar file and paste them in an empty folder
in the other computer. The data should remain the same as it was in your previous computer.
Q: I have tried double-clicking the projact.jar file but the application does not open.
A: Please ensure that you have loaded the projact.jar file from our latest release on our github website.
Check the Java version on your device and ensure that it is Java 11 and above. If it still doesn’t work,
a temporary solution could be to open your Command Prompt (Windows OS) or terminal (MacOS) and key in java -jar <path_of_file>.
For example, java -jar C:\Users\name\projact\projact.jar. We understand that this may be troublesome over time, so please
drop an email at siqiang@comp.nus.edu.sg or raise an issue on our github page.